
This tub to shower conversion project was for a property investor who wanted to turn a very ‘blah’ south Austin house with 1980s builder-grade fixtures into a bulletproof low-maintenance affordable rental with long-term renter appeal to minimize turnover. The original very dated tub/shower fiberglass insert was already likely leaking around the drain, and therefore needed to be replaced anyway:


The Tub to Shower Conversion Challenge
Changing a bathtub into a shower is relatively easy if you’ve got easy access to the drain plumbing (like on a second floor bathroom or on a pier-and-beam foundation with 18-in or more of crawlspace clearance). Doing a tub to shower conversion on a concrete slab foundation is more difficult, because the main drain plumbing is literally buried in the ground.
But, at least it’s usually not buried in concrete. Tub drain plumbing is almost always “boxed” when the foundation slab is poured. There are ~8×20-in box holes intentionally left in the slab to make any future bathtub re-plumbing easy. Here is an example:

But this still doesn’t make converting a tub to a shower on slab a slam-dunk easy process. Tub drains are one and a half inches in diameter, but modern showers use 2-in drains. So, retrofitting a tub with a custom tile shower on slab will require digging down below the original tub plumbing trap to get at the main 2-in drainpipe.
Sometimes the tub drain slab box hole is large enough that you can easily dig down to a splice point in the main drain line and plumb a new 2-in drain trap for the shower install without expanding the slab hole. Most of the time, though, it isn’t.
Step ZERO: jackhammer!
You can’t know how extensive the drain plumbing work has to be before ripping out the existing tub (or tub/shower inert) to look at the concrete slab underneath. For this tub to shower conversion project, demo looked like this (you can see the backside of another fiberglass tub/shower insert in the second bathroom):


And yep, one of those pics features a small jackhammer. This turned out to be yet another case of not getting lucky. That is why converting a tub to shower on slab is generally pretty expensive. It is almost always a dusty messy pain to accomplish, and no one likes running a jackhammer in a closed 5×8 room.

Step ONE: plumb the shower drain
Once the foundation hole around the waste plumbing was widened and the main 2-in drain pipe dug out, the actual shower drain re-plumbing was straightforward.
Since my shower floor installs use Kerdi fabric for waterproofing, this meant just ensuring that the Kerdi drain was at an ideal 1-in height off the slab when at level. The easiest way to ensure that is to use a flexible rubber no-hub coupling to connect the new fittings with the legacy drain line. This gives a bit of literal flexibility while at the same time conforming to building codes specifying unshielded rubber couplings for below-ground waste pipe connections:

Once the new drain piping and coupling is in place for a tub to shower conversion on slab, the foundation hole needs to be backfilled with a combination of sand, packed gravel, and new concrete mix. Don’t skimp on this step for a true trouble-free custom shower conversion, since you’ll need a literal firm foundation for the new shower floor.
Step TWO: reframe the walls
You’ll also need to do some creative wall re-framing if you’re planning on adding a wall niche to your new shower install. Also, old leaky tub surrounds usually cause dryrot damage to the existing wall framing anyway. The bottom line? Plan to do some carpentry anytime you open up a wall!
We got lucky on this project. Although having another fiberglass tub surround back-to-back in a shared wall made framing the wall niche a little complicated, at least there wasn’t any significant dryrot damage to fix.
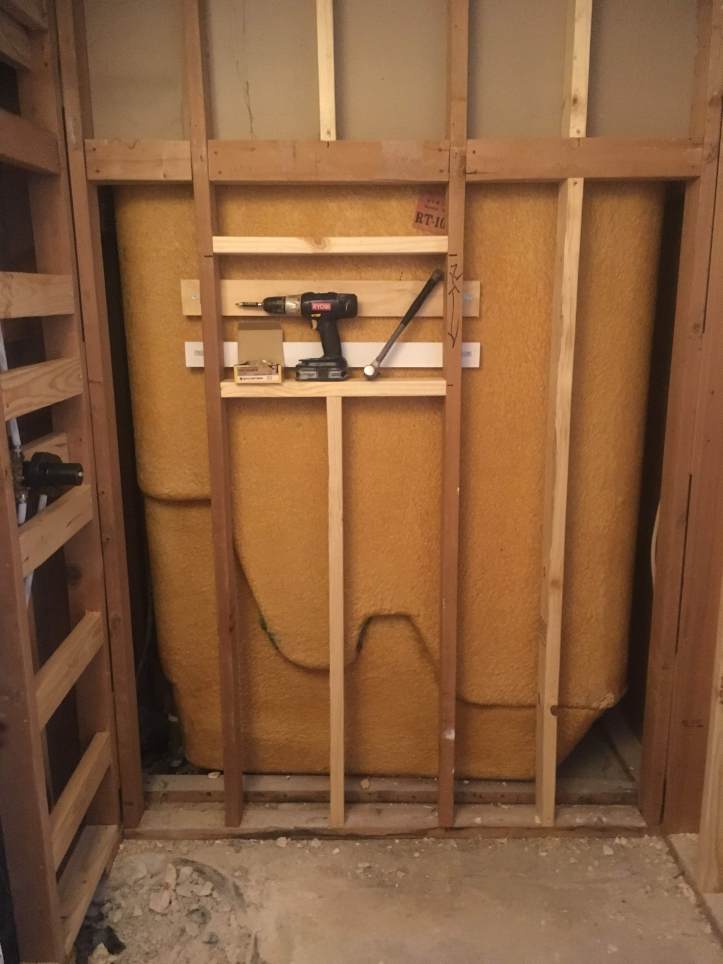
Be sure to think ahead when you reframe shower walls for an inset niche. You will want the niche opening to match the final wall tile pattern and dimensions for a stylish result.
Step THREE: install backer and waterproofing
You’ll now need to install concrete backerboard for the new shower walls and a custom-sloped concrete base for the shower floor. Mixing and installing drypack concrete for the shower base isn’t any more complicated than making a sand castle, but does require some practice and skill.

The final tile prep step is waterproofing. Since my shower installs use a continuous waterproofing barrier directly underneath the tile and grout, this means Kerdi fabric for the shower floor and curb and RedGard for the shower walls.


Although it might not look pretty, this combination of waterproofing materials makes for a completely watertight shower from floor to showerhead. As you can see from the flood test (filling the shower floor full of water and letting it sit to check for leaks), Kerdi fabric performs fantastically:

Step FOUR: install the tile and grout!
This client decided to use large-format ceramic tile in an offset subway-style pattern. This is a pretty common butget choice. However, the client wanted a vertical rather than horizontal subway pattern. This required a few tricks for getting the tile install just right, as you can see from the in-process pics:


Always install the shower floor tile BEFORE the bottom course of wall tile to ensure a seamless finished look. The client chose hexagonal marble mosaic floor tile to complement the shower’s neutral nwall tile color and modern style.

Using large format ceramic floor tile for shower walls and inexpensive marble hex mosaic tile for shower floors is a great way to make a custom tile shower look more expensive than it actually is. A skilled installer can make even inexpensive materials shine.
Tile Install TIP!
Here’s a pro tip for installing mosaic tile mats for shower floors or even on walls. Use a really thin layer of thinset. Seriously, a well-spread thinset layer laid with a really small 1/8-in notched trowel like this one is all you need to ensure that the tile is well adhered:

If your thinset layer is nice and thin, then you’ll be able to push the mosaic tile mats firmly to the floor (or wall) surface for a nice flush install without the thinset squeezing completely through the tile joints:

This is how to get firmly-adhered tile without having to spend tedious hours picking dried thinset out of the tile joints. Speaking of, this is what the tile install looked like just before grouting:


Since the ceramic wall tile couldn’t have exposed outer edges (which would show the fired clay layer underneath the ceramic surface coating), this install needed edge trim. The client chose to use metal edge trimming rather than bullnose tile, which accentuated the clean contemporary look they wanted. This was also a cost saver. Metal edge trimming is almost always cheaper than 40+ linear feet of bullnose tile.
Grouting TIP!
Grouting was a messy all-day process, as it always is. Even large format wall tile takes care and patience for perfectly even grout lines:

I used “Mapei Ultracolor Plus FA” grout for this project. It is my favorite presealed grout. Remember that this shower is for a rental home. The client wanted to be sure that the shower would be very easy to thoroughly clean. A dense presealed grout will make this shower very easy to maintain.
Step FIVE: install the glass
>The shower was now almost ready for use (and definitely better looking than the old, scratched, and leaky fiberglass tub surround it replaced):


The last step was glass install. Instead of custom frameless glass, the client chose to go with a shower glass enclosure kit. This cut the material cost in half (since an off-the shelf shower glass kit is less expensive than custom-cut glass made to order). Also, someone like me who’s careful and has excellent handyman skills can install just about any sliding shower glass kit.
The most annoying part of installing any shower glass enclosure kit is the need to drill through tile for screw holes. It takes the right bits, a good drill, and a little bit of patience.
The Tub To Shower Conversion Finish!
The final tub to shower conversion looked like this after I installed the sliding glass enclosure:


A real improvement over the original!

