
Are you planning a new tile shower installation? Talking to contractors about shower waterproofing can be confusing. This post explains how to build a truly waterproof custom tile shower. A properly waterproofed tile shower will last a lifetime. A badly done shower might unfortunately last only a few months. Read on to learn why!
Waterproofed Shower vs Leaky Shower: What is the difference?
There are showers that leak, and there are showers that don’t. It’s really that simple. There are several different ways to waterproof a tile shower install, but every method aims for the same goal. You need to keep water from getting out of the shower.

Shower construction materials are more sophisticated now than even just a few decades ago. Yet there are still plenty of contractors who still make showers like it’s 1950. There are also unfortunately plenty of shady installers who specialize in making showers ‘guaranteed’ to last all of a year or two. This post explains three ways to properly waterproof a custom tile shower using both traditional and new materials.
Traditional Shower Waterproofing
Traditional shower waterproofing puts a flexible PVC vinyl liner (or a made-in-place rigid fiberglass liner) underneath a layer of packed concrete. It looks like this:

Tile and grout are not waterproof. Every time you shower (using ~20gal of water total for an 8min shower at 2.5gal/min), some water passes through the tile and grout shower floor and into the sloped cement mortar bed underneath. The base mortar bed then (hopefully) gets rid of this moisture before the next use through simple evaporation back up through the shower floor tile layer and by wicking and eventually draining through “weep holes” in the part of the shower drain that you don’t see.
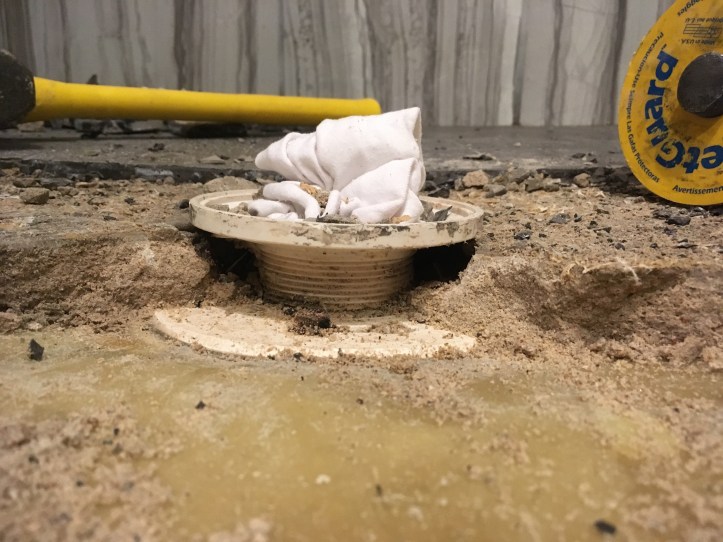
The shower drain opening that you do see when you look down is actually only the very top part of a traditional shower drain assembly. There’s a ~1.5in section between the visible top of a traditional shower drain and the PVC vinyl liner or fiberglass pan below.

This buried section of the shower drain has little weep holes in the drain flange that allows the moisture absorbed by the shower base concrete to eventually wick into the drain hole.
Sandwiching a layer of porous concrete between the shower floor tile and the waterproofing liner underneath isn’t ideal. This concrete layer will get moist every time the shower is used, since even sealed grout is not waterproof.
How Traditional Shower Waterproofing Can Go Bad
Remember that the whole point of traditional shower construction was to work around limitations from the previous century. Before the 1990s, there weren’t any waterproofing materials that you could properly install tile directly onto. And, tile and grout aren’t waterproof. Therefore, the best solution for waterproofing a shower base was to put a waterproofing membrane (PVC or fiberglass) underneath a sloped concrete layer.
Unfortunately, this makes for lots of install steps that all have to be done correctly for the entire thing to work properly. In engineering terms, there are lots of failure points. Here’s a list:
No preslope
Remember that the concrete layer underneath the shower floor tile is designed to absorb moisture in traditional shower construction. This moisture then evaporates back out through the grout and also drains out through weep holes in the sides of the shower drain. However the moisture absorbed by the concrete base won’t effectively move towards the drain’s weep holes unless the waterproofing liner below is also sloped.
Presloping the waterproofing membrane takes at least a half day of work. So, many shower installation contractors skip this step. This results in a shower base that takes longer to completely dry out, which in turn results in a musty shower floor.
Blocked weepholes
Some shower installers will just pack a concrete shower base right up tight underneath the drain assembly. This blocks the weepholes, and therefore makes the whole shower base slow to dry out between uses.

To make sure the weepholes stay open, the installer needs to put small pea-sized gravel all around the base of the drain flange. This ensures that the shower base dry pack concrete doesn’t block the weepholes.
Open seams, holes, or old age
Have you ever struggled to perfectly wrap a gift? It can be hard to get all the wrapping paper seams perfectly overlapped for a great result. Now, imagine trying to seamlessly wrap the INSIDE of a box. Covering a custom shower floor in PVC liner is kinda like that.


Even a very careful PVC liner install will leave folds at the corners. Also, most installers will glue together several PVC pieces to make the install easier. A good installer will carefully seal all of these seams and corners. A not good installer won’t, and your shower will leak as a result.
And finally, flexible PVC plastic is only flexible because the cross-linked polymer chains have been baked with additives. Unfortunately, these chemical additives gradually leach away over time. This leaves the PVC liner brittle and prone to cracking with age.
Even a perfectly installed PVC liner can simply crack due to shifting from temperature changes or very minor foundation settling movement after it gets brittle from a decade or more of use.
Too shallow

Remember that a PVC liner is basically a waterproof tub that needs to cover everything underneath the shower floor and extend at least six inches or more up the shower wall. If the liner doesn’t cover at least the base of the shower walls, then water will wick up into the wall framing from the concrete shower base.
Moisture is tricky. It will wick up instead of down if given a chance to work against gravity. If the concrete base of a shower floor goes all the way up to the top of the waterproofing liner underneath it, then moisture absorbed by the concrete shower base will overtop the waterproofing liner and get into the walls. This will then cause a lot of problems.
Wrong place
Remember again that tile and grout are not waterproof. This includes the tile and grout that gets installed on shower walls. Some moisture will wick behind the tile walls each time you use a shower. That’s why it is important to waterproof the shower wall substrate too!
But even a nicely waterproofed shower wall substrate won’t help if the shower base liner isn’t properly installed behind the shower wall substrate:

If the shower pan liner is installed on top of the shower wall substrate instead of behind it, then water will wick up behind the liner and into the wall framing. This will cause the wall framing to quickly dissolve into a moldy dry-rotted mess:

How to Waterproof a Tile Shower with MODERN Materials!
There are some other things that can go wrong with a traditional construction shower install, but hopefully you get the point. Making a truly waterproof shower is difficult using traditional methods and materials that can fail in multiple ways. Ideally, you want a continuous waterproofing layer directly behind all the tile in a shower. This is easy to do today using two materials that came on the market in the 1990s.
Kerdi waterproofing
Kerdi is a hydrophobic polymer fabric that will adhere to just about any surface (concrete, cement backerboard, drywall, even plywood) using plain unmodified thinset. Kerdi is engineered to bond with thinset, so tile can be put directly on top of the Kerdi fabric. And overlapping Kerdi seams create a completely waterproof seal since the fabric is actively hydrophobic.


This means you can “wallpaper” the interior of a shower space in a continuous layer of waterproof Kerdi and then tile directly on it. Moisture that seeps through the tile and grout immediately meets a completely waterproof substrate. This is how Kerdi waterproofing makes for a more waterproof custom tile shower install versus traditional methods.
RedGard waterproofing
RedGard is just one common brand name for a paint-on waterproofing material that also bonds to concrete, cement backerboard, drywall, and even plywood.
The technical term for this material is “elastomeric waterproofing membrane”, which is basically a fancy way to say “rubbery paint that dries to form a plastic-like waterproof barrier”. It looks like this when dry and ready for tile:

RedGard bonds directly to thinset. It puts a truly waterproof barrier directly behind surface tile and grout.
Paint-on waterproofing is technically code-approved to use for waterproofing shower floors too. However, a true pro will only use it for waterproofing shower walls. As the paint-on waterproofing dries and cures, it contracts just a bit which can cause pinholes or small cracks. This is why a good installer will put two coats on shower or tub enclosure walls. Some small pinholes or cracks in the waterproofing aren’t a big deal for shower walls made from concrete backerboard. But even a small chance of pinhole moisture leaks is unacceptable for a shower floor.
Elastomeric paint-on waterproofing is also technically code-approved for waterproofing plain drywall for shower or tub surround walls. Again though, true pros use only cement backerboard for shower and tub surround walls. A small amount of moisture absorbed into a small patch of cement backerboard isn’t a big deal. Even a small amount of moisture periodically absorbed into drywall is a big deal though. Cement backerboard doesn’t fall apart when wet, and cement isn’t food for mold. Drywall does fall apart when moist, and drywall is fantastic food for mold.
The best of both
RedGard is easy to apply and perfectly safe to use for waterproofing the concrete backerboard underneath shower wall tile but not 100% foolproof for waterproofing a shower floor. Kerdi fabric, on the other hand, is a pain to hang on walls but absolutely guaranteed bulletproof for waterproofing shower floors. So why not combine both? That’s what I do.
Using Kerdi for the shower floor waterproofing gives great peace of mind, and using RedGard to waterproof the cement backerboard walls saves time over hanging Kerdi throughout.
Final Tip: Don’t Panic!
Properly waterproofing a tile shower installation can seem complicated and confusing. But it really just boils down to commonsense and knowledgeable installation. So don’t hold back on the questions when you’re interviewing potential shower installers. Ask ’em what kind of waterproofing strategies they use, and why. If they respond with something that’s confusing or that simply doesn’t sound right, then ask ’em to explain.
A knowledgeable shower installation pro should be able to very clearly explain what materials they use and why. A dopey sloppy installer, on the other hand, will usually fold pretty quickly under questioning.
Just remember — if you’re talking to a tile installer who can’t outsmart water, then they’re probably not going to seem very smart to you!