
So you need to convert a tub to a shower. This might seem like a hugely complicated remodeling project. However it’s actually usually pretty simple, especially for a second-floor bathroom. I’ve made several posts (you can read all of them here) explaining how to convert a tub to a shower on first floor slab foundations. This post describes every step for how to convert a tub to a shower on a second floor wood subfloor.
First, Drain Plumbing Basics
Connecting to a 2″ or larger diameter pipe is critical for a proper tub to shower conversion! Tub drain pipes are smaller than shower drain pipes. Showers are required by code to drain directly into 2″ diameter piping. Tub drains are designed just like bathroom sinks with a 1-1/2″ pipe size.
So, an existing bathtub drain pipe is smaller than your new shower drain and p-trap will need to be. And, you can’t run a 2″ drain into a downstream 1-1/2″ pipe without causing a potentially major plumbng problem. Like, a 10gal or more of water sloshing across your bathroom floor problem.
Wood Subfloors: Just Basic Carpentry!
The good news? Since the 1990s, builders have generally run 2″ drain pipe right up to bathtub p-traps. The even better news? If your bathroom is upstairs (or on a pier-and-beam foundation), then it’s quite easy to convert a tub to a shower. You can just cut right through the subfloor to redo the drain piping.


Properly patching the floor back up is simple to do with just basic carpentry skills. Converting a tub to a shower on a wood subfloor is just as simple as simply replacing a shower. If a contractor tells you that converting a tub to a shower on a pier and beam foundation or second floor will require super-expensive drain plumbing work, then get a different contractor for the job.
Here is the ENTIRE process!
This post shows what the process of converting a tub to a custom tile shower looks like for an upstairs bathroom with a plywood subfloor. This post also gives lots of cost-saving tips for getting great results on a budget.
The Project
These clients had twin teenage daughters whose two bedrooms shared a common “Jack and Jill” type bathroom. Their kids had outgrown the need for a bathtub. So the clients wanted to convert the tub/shower combo into a walk-in shower. It wasn’t possible to get a single wide photo of the entire tub/toilet alcove but these pics hopefully paint a clear starting picture:


The GOALS:
The clients wanted four things from this project.
- A walk-in tiled shower. Their kids were done with the tub. The bathtub was also pretty scratched and dinged up from 15yrs of use, starting to rust, and therefore needed to be replaced anyway.
- Maximum storage. Twin teenage girls need a lot of shower products.
- Stylish design. The clients were thinking ahead for future resale. They wanted a shower that would appeal to future homebuyers.
- Reasonable price. The clients had a modest budget for this project. They had also gotten a few previous price estimates that were double or triple their budget.
Fortunately, it was entirely possible to meet all of these needs for $10k total and a 14-day install time. Not every tub to custom tile shower conversion can be done this easily or quickly, but this particular project had plenty of cost-saving and a few time-saving opportunities.
This detailed project description can hopefully be informative for anyone wanting to convert a tub to a shower with a reasonable budget.
Step ONE: Demo
Getting rid of an old bathtub is simple. Simply take it out in pieces. Acrylic plastic or fiberglass tubs are easy to cut apart with a sawsall and basic demo blade. Thick heavy cast iron enamel tubs are nigh impossible to saw through, but fortunately cast iron is very brittle. You can knock a cast iron tub into pieces with a sledgehammer. These folks had an enameled steel tub, which is the most annoying type to demo but still pretty easy. Simply get yourself a full pack of metal sawsall blades and go to town.
All the previous tub surround tile also had to go, so some careful sledgehammer blows to the walls (be mindful of the supply plumbing) and a few additional hours were needed to get everything to the studs and subfloor. Here’s what the project looked like at the end of day one:


Here are some tips for a clean to the studs tub surround demo. Most importantly, be careful with the sawzall! You can see that this second story tub surround alcove was right next to a really important HVAC stack. Also, accidentally cutting through a water line would have been pretty catastrophic.
It’s also a real good idea to be conservative about what you rip out. At the time of demo, the clients were unsure of whether or not to make the shower tile go all the way to the ceiling or not. So, making a clean cut all around the original tub surround tile perimeter with an oscillating tool (and therefore preserving all of the original non-tiled drywall) made it possible to push this decision down the road.
Step TWO: Re-Plumbing
Again, this was a second story job. So getting access to the plumbing guts was simple straightforward subfloor carpentry surgery.


Aside from not needing to jackhammer through concrete to access the drainpipe, there were a couple more things that saved plumbing costs on this particular project.
FIRST, the clients were fine with re-using the existing mixing valve and plumbing trim. It was all relatively modern Pfister -brand hardware, so was good to go for at least another decade even with hard limestone Austin water. And, replacing the mixing valve guts or changing out the handle trim style would both be possible to do anytime in the future without cracking through the shower wall tile. Modern modular plumbing is cool that way. Overall, reusing the existing mixing valve and trim saved at least $250.
SECOND, the clients were happy with the existing mixing valve handle and showerhead height. And, there was enough slack in the flexible PEX supply lines to yank ’em right up into the wall cavity below the subfloor. Therefore converting the supply plumbing for a shower-only setup only required cutting and capping the tub spout line, which didn’t require a pro plumber. This all saved an additional $250 or so.
Redoing the drainside piping for a perfectly centered 2-in shower drain and p-trap was also easy, just a matter of gluing together some new PVC and then buttoning the subfloor back up.
All the re-plumbing and associated carpentry work took a day.


Step THREE: Re-Framing
Sometimes you need to do quite a bit of carpentry to convert a tub to a shower. Fortunately, this wasn’t one of those times. Since the supply plumbing (the mixing valve and showerhead piping) wasn’t changing, there wasn’t any need for carpentry work on that wall. However, since the clients wanted maximum shower storage space, the opposite wall did require some re-configuring.
Fortunately, this wall was completely non-loadbearing (it backed up to a HVAC void space). Carving out a space for a greatly enlarged vertical shower niche was therefore just a matter of careful stud cutting and re-configuring. It took a half day.


The trick to making a perfectly centered wall niche opening is to plan ahead and also to leave room for later adjustment. Make sure that you decide on the wall tile size and layout before closing up the shower walls with backerboard. Also, frame the opening with extra space all around. It is very easy to make a tiled niche smaller in any dimension on the fly while actually installing the tile. It is, however, very difficult to make a niche opening in any way larger once the wall is closed up with waterproofed backerboard.
Step FOUR: Waterproofing
From here on the project was “just” a matter of installing a new tile shower from the studs up. There are of course many ways to screw this up, but not if you’re a conscientious pro. My recommended waterproofing method is concrete backerboard and RedGard for all the wet area walls and Schulter Kerdi for the shower floor “pan” and wrapped around the curb. This places a continuous waterproofing layer directly underneath the surface tile, and results in a watertight shower that can outlast the house.
There are two key things to a perfect tile shower finish that are really important to get right at this step.
The first is the concrete backerboard install. Make certain that the 2×4 wall framing is perfectly plumb and level. If it isn’t, then be sure to shim the backerboard to accommodate. It is difficult to install any shower wall tile to flush if the underlying backerboard is not also flush and level.
The second is the concrete shower floor install. Getting a completely even 1/8-in per foot of run pitch to the drain over the entire shower floor is critical for effective drainage. Here’s a blog post with detailed directions for how to make a perfect shower floor “pan” slope if you’re interested in the deep details on this.
Installing backerboard, filling seams with Sika sealant, waterproofing the walls and niche with two coats of RedGard, installing the concrete deckmud shower floor, and waterproofing the shower base and curb with Kerdi took three days total. You don’t want to rush these steps. Concrete takes time to set and multiple coats of RedGard takes time to dry. It is what it is.


Step FIVE: Field Tile Install
The clients used a really smart trick to keep tile costs low and future shower cleaning to a minimum. They bought white ceramic subway field tile and trim bits from Floor & Decor. There are lots of options for getting tile, but in ATX it’s almost impossible to beat F&D for a pretty good selection at a budget price. Trust me on this. I’ve checked.
White ceramic subway is like the simple black dress or classic tuxedo of tile. It’s always in style and easy to keep clean. Didja know that you can clean a wool tuxedo jacket to as-new with a simple vodka spritz and brush? True fact. Similarly, basic high gloss or semigloss porcelain coated ceramic tile is resistant to soap scum and can take any cleaner you care to throw at it. It’s a great choice for both teenager shower use and future homebuyer appeal.
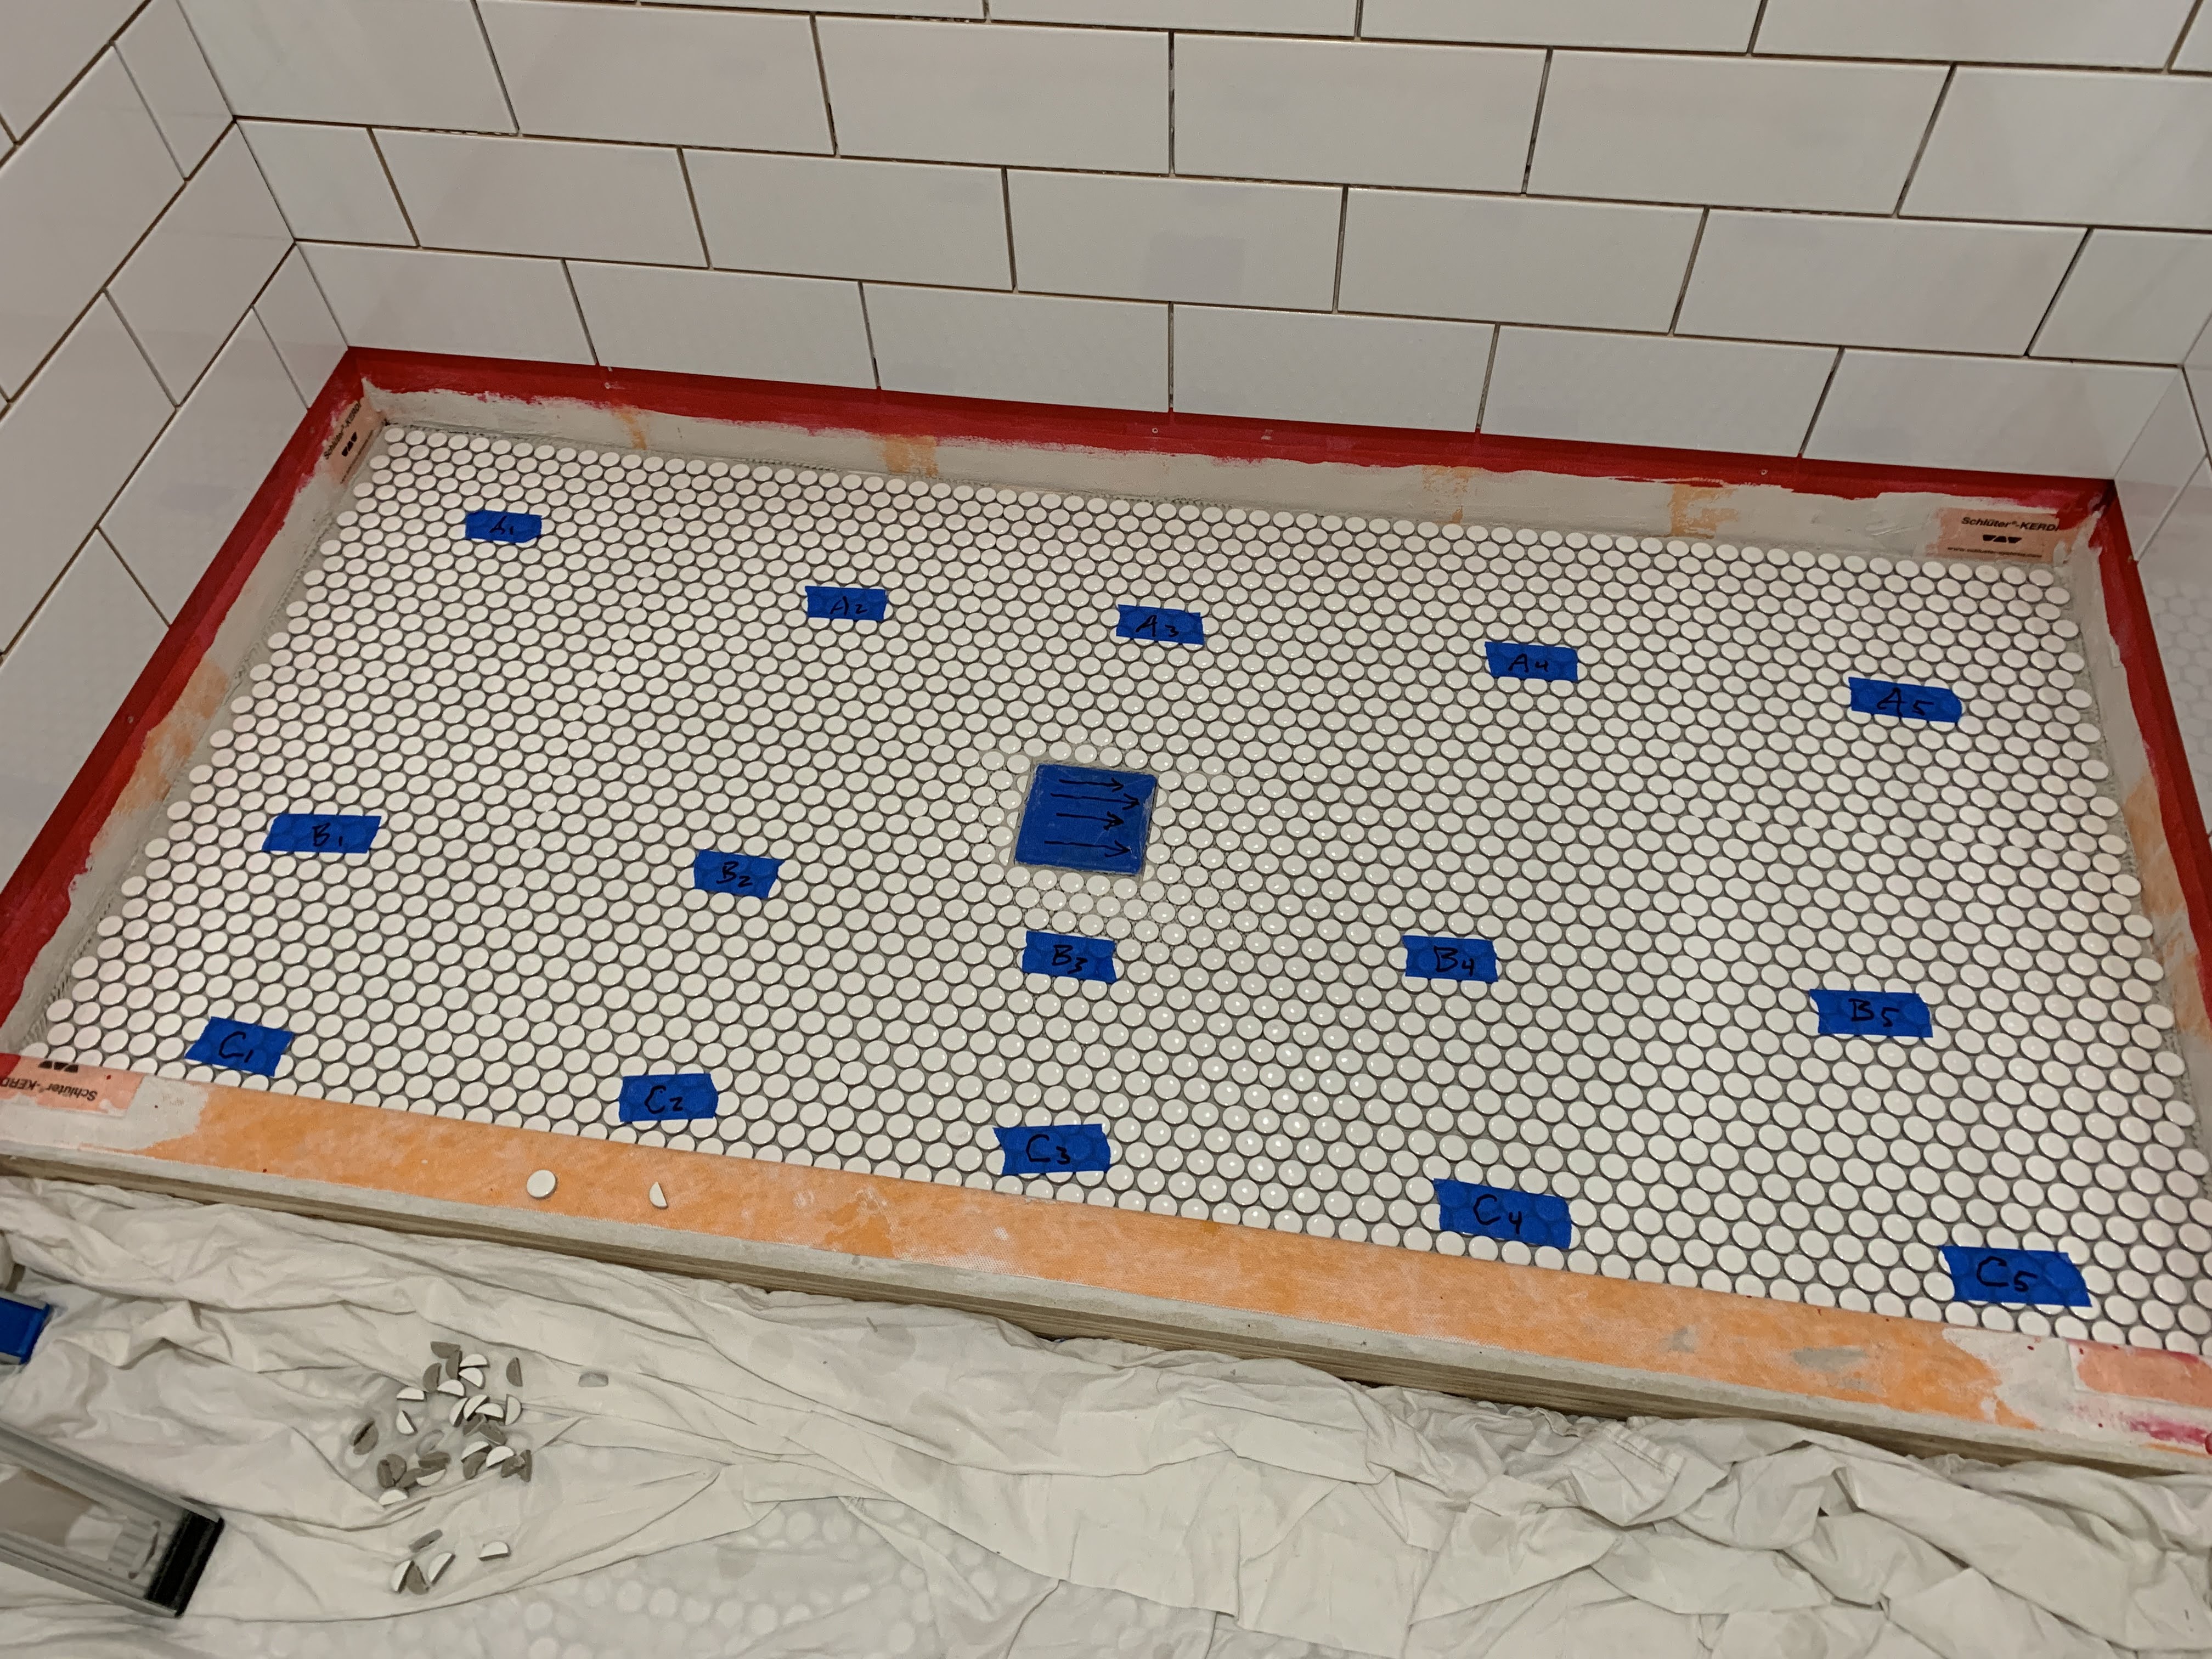
The clients also chose white penny mosaic tile for the shower floor to match the existing penny floor tile that was used for the rest of the bathroom. This also kept costs low (white penny mosaic is always a budget mainstay) and kept the overall design consistent with the midcentury art deco style.
The trick for making any tile choice look good is layout planning. Nobody likes the look of little unbalanced slivers in corners or uneven grout lines along horizontal or vertical seams for shower wall tile, and seams between mosaic floor tile mats can be impossible to unsee once you’ve noticed them. There are lots of layout planning and installation techniques for preventing all these problems, but I’d be executed by the tile install mafia for daring to divulge every trade secret on the interwebs.
I can though offer pics, and let you know that the field and shower floor tile install on this project took four days total.


Step SIX: Trim Tile Install
There are four decisions to make when it comes to trimming out a custom tile shower with a large vertical niche:
- How to cover the open perimeter field tile edging
- What material to use for the niche shelving
- What kind of tile to put on the back of the niche
- How to make the shower curb as plumb and level as possible
Again, the main goal on this project was to keep the budget low and the design simple. This is one of the reasons why the clients chose classic white ceramic field tile to begin with. It made the choice for edging all the outside tile perimeters and the niche opening super simple. They just chose to use classic white 2×6 bullnose, which is the least expensive tile trim option for this style of tile.
The clients made another smart budget saving design choice for the vertical niche shelving. A common default shower shelving choice is glass, but safety glass can be sneaky expensive and can also slow down a project since it can’t be cut onsite with a wetsaw. So, for this project the clients chose to make the niche shelving out of solid marble tile pieces. Marble tile is easy to custom cut to width, is sneaky inexpensive, and has a nice underside appearance since it’s a solid stone material.

It also matched well with the marble tile mosaic that the clients chose for the back of the niche. This is the one design element that they splurged on. It would have been very expensive to tile an entire wall with this $25/ft2 marble mosaic. But using it just as an accent tile for the niche only required five sheets total. Limiting design flair to just a niche opening can really help to keep the overall tile cost low.

For the shower curb, the clients chose to use precut marble threshhold pieces. This was a smart decision for three reasons. First, marble can be sneaky super-inexpensive. Covering the entire 5-ft wide threshhold only took two pieces, for a total material cost of just $30. Second, using the same material for both the curb and niche kept the overall shower design consistent and unified. And third, using just two solid stone cap pieces made it very easy to ensure that the whole curb was perfectly level and square to the walls.
Installing sliding glass shower doors that are completely plumb with tiled walls requires a perfectly level curb. A shower curb also needs to be uniformly pitched inward by 1/8-in or so to ensure that water doesn’t pool on top or leak over to puddle on the bathroom floor. Capping the curb with just a couple solid stone pieces makes it easy to achieve all of these things.
This project required a lot of trim tile (niche back and interior, niche shelves, bullnose perimeter, and curb). So it was a long day, but installing all the trim was still done in just one day.
Step SEVEN: Grout Install
Remember that these clients wanted a shower that would be low maintenance and very durable for heavy use by a pair of teenagers. Their light grey grout color choice was perfect for this goal. Of all possible grout colors, grey is the best for minimizing the appearance of soap film. Grey also always goes well with white subway tile for a nice non-clashing contrast, and for this project it nicely complemented the grey tones of the marble niche and curb trim.

My favorite grout for showers and tub surrounds is Mapei’s “Ultracolor Plus FA” formulation. It’s a presealed grout mix that combines the best qualities of both traditional sanded (dense and durable) and unsanded (easy to install and won’t scratch polished tile surfaces) grouts. While no amount of sealant will make grout waterproof, a quality presealed grout will remain water resistant for years and will therefore be stain resistant and easy to clean. The “Ultracolor Plus FA” grout in particular is very dense and durable, so can handle any cleaning product and should last a lifetime without cracking or hazing. It’s a great choice for floors and high-use showers.
Grouting this shower installation took a long full day. It always does.
Step EIGHT: Caulking
Putting caulk into the inside seams of a tile shower is purely aesthetic. Tile and grout are not waterproof. So, putting caulk in your shower will not make your shower waterproof. Waterproofing happens below the tile layer, not on it. I repeat, NO AMOUNT OF CAULK WILL WATERPROOF YOUR TILE SHOWER!
Caulk can, however, make your custom tile shower look great and help it to be easy to clean. Here’s why and how.

It’s impossible to pack a vertical inside tile joint with grout that will last. Grout is great for filling joints between tiles, but it doesn’t stick well to the surface of polished tile. Trying to jam grout into an inside tile seam is basically like smushing grout onto the surface of a tile and expecting it to stick there forever. Grout permanently sticks between tiles, not on top of ’em.
This is why silicone caulk is used to seal the inside seams of a custom tile tub surround or shower. Silicone caulk can expand and contract with temperature changes and won’t dry out and crack. It’ll resist mold growth and keep seams sealed for easy cleaning. Filling the inside seams of your tile shower doesn’t by itself make the shower waterproof. Seam caulking can, however, make your shower super-easy to keep clean and looking great if you do just just two things.
FIRST, use the proper caulk. Don’t get a tube of white or tan from the paint aisle. Go to the tile section of Lowes (for Mapei) or Home Depot (for PolyBlend) and get color-matched siliconized grout caulk. This is the proper material to use for a good-looking result.


SECOND, mask off the caulk seams with painters tape for perfect lines. Silicone caulk is messy, sticks to everything, and is very difficult to make perfect with just a finger. Masking with tape is the only foolproof way to get a perfectly straight and even caulk line. It’ll take an annoyingly long time to tape all the seams for preparation. But once properly prepped, the actual caulking will take just a few minutes.
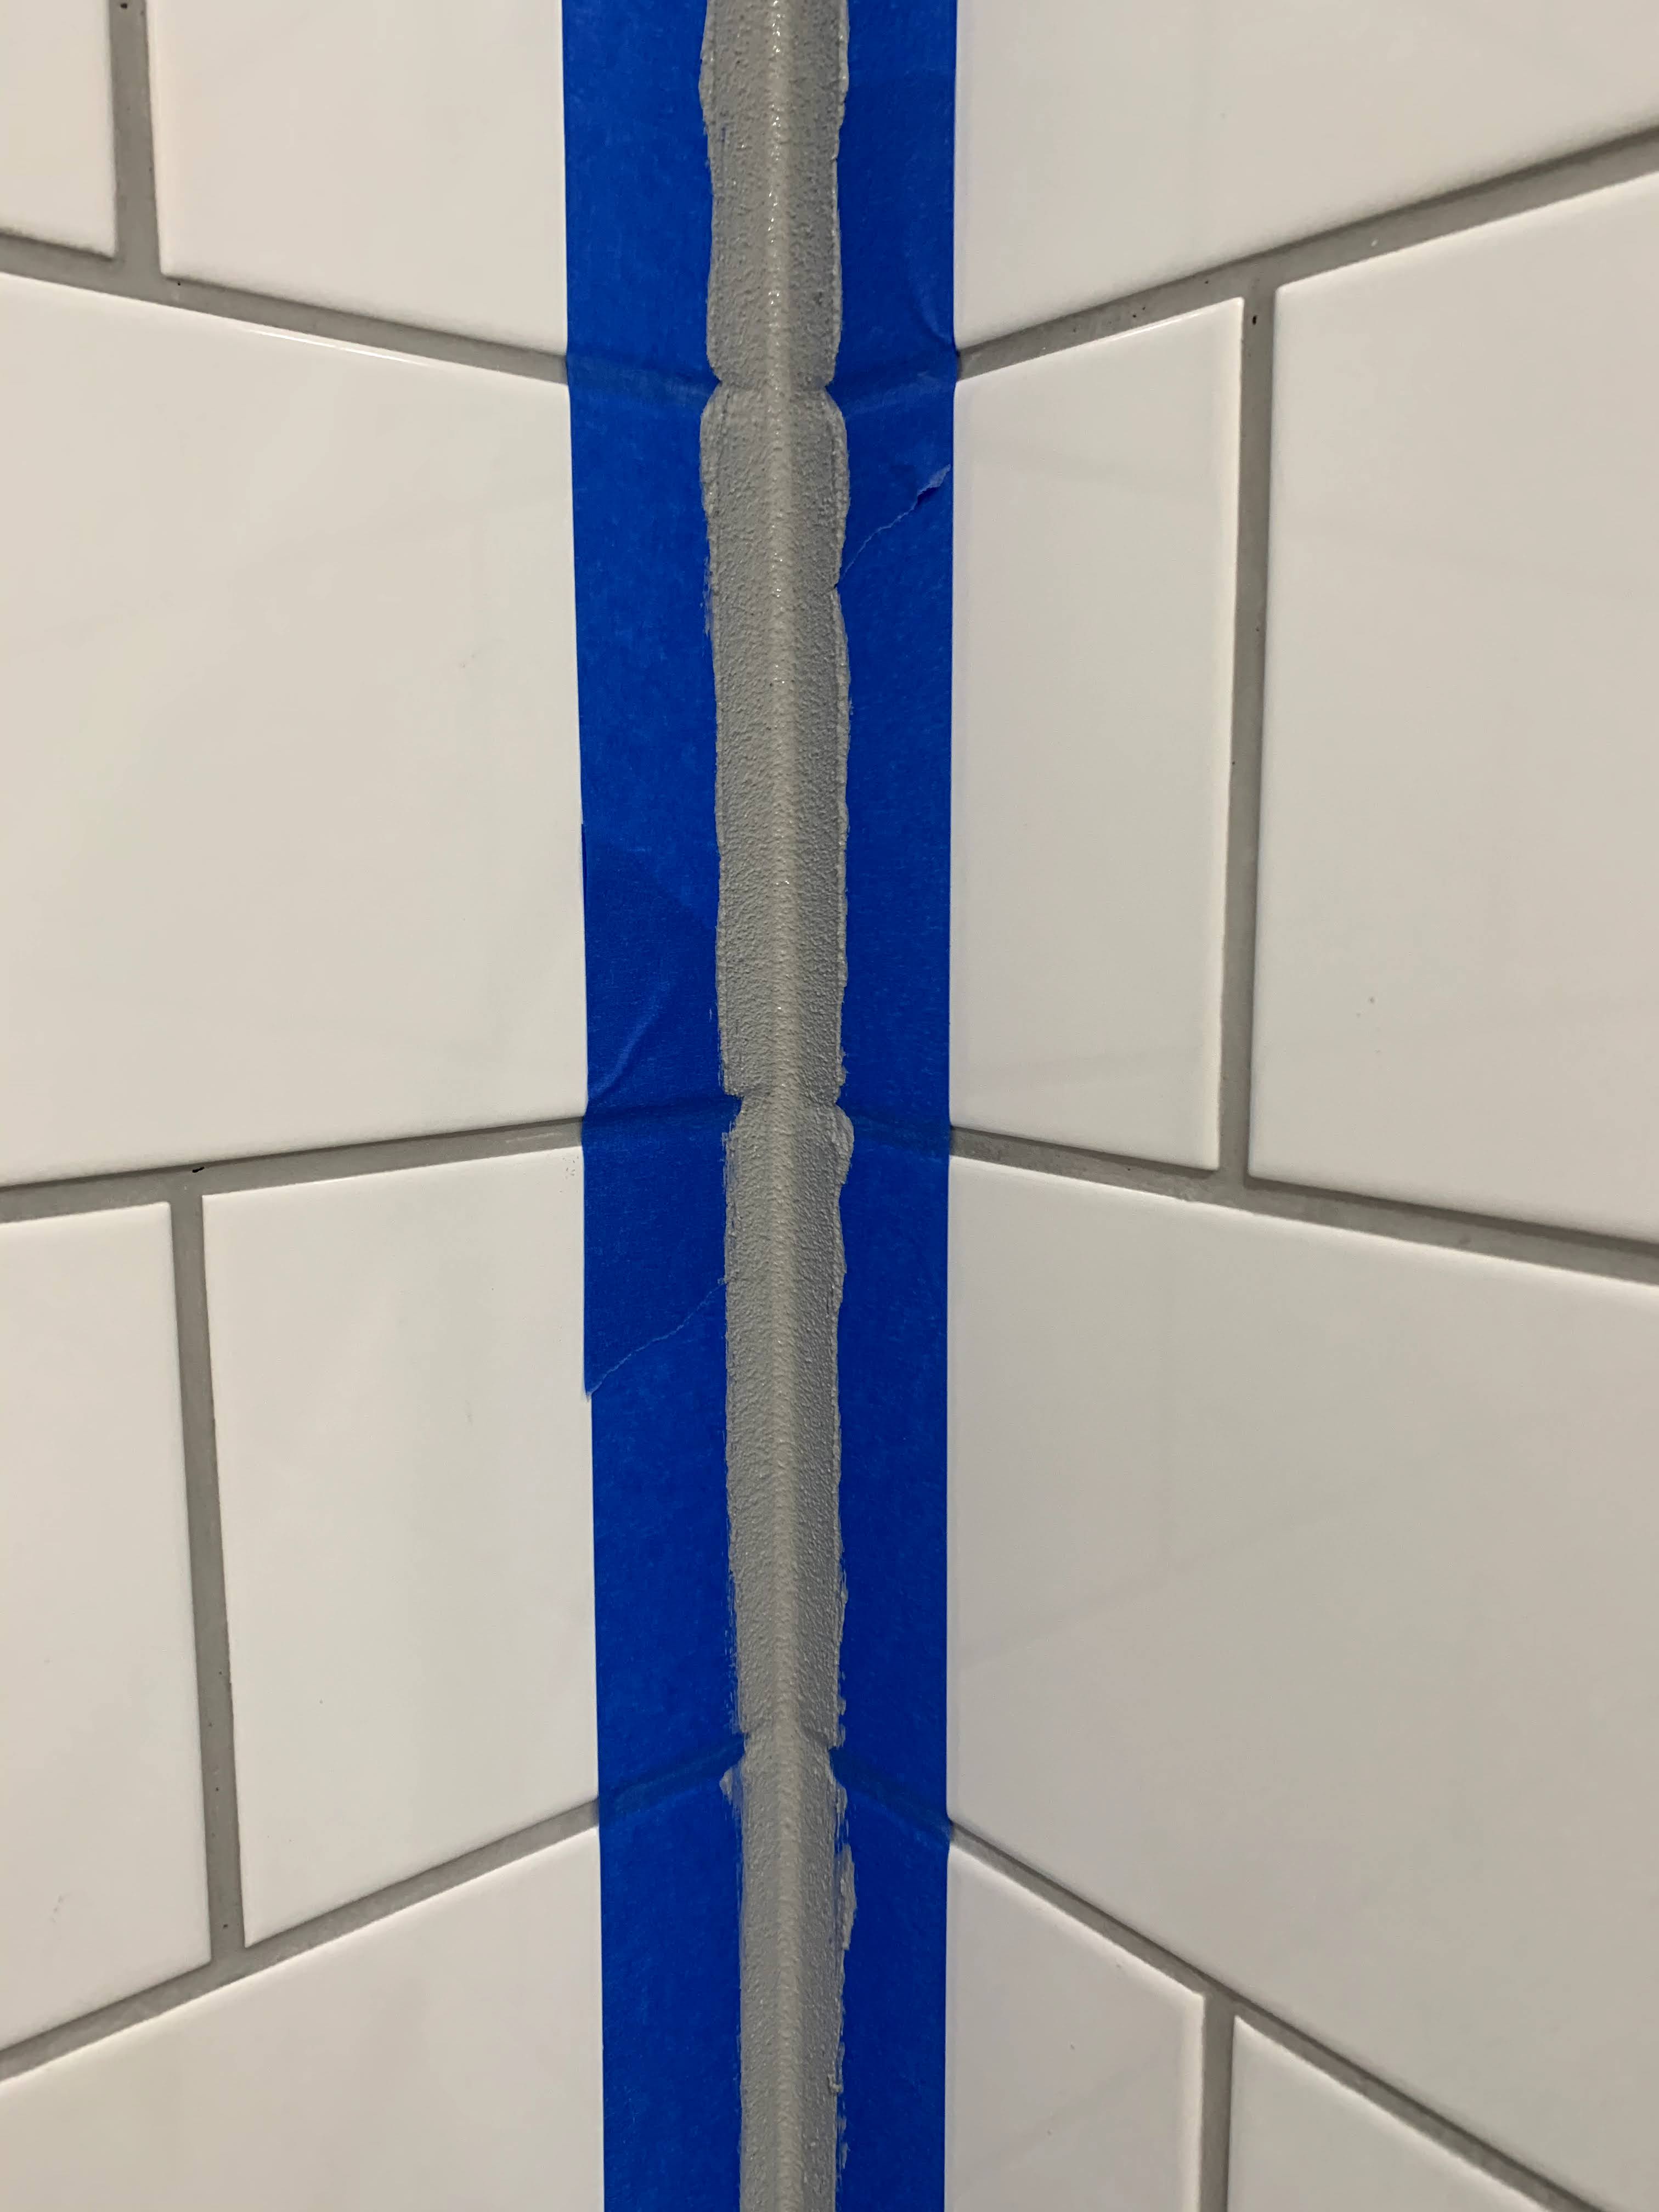

Trust me, use tape for a perfect seamcaulk finish. Caulking seams adds a day to the shower installation schedule. It takes a half day of work time, but sanded grout caulk needs to harden and cure at least overnight before going on to the last shower install finish bits.
Step NINE: Glass Install
Glass is expensive. That’s just a fact. But, there are a couple ways to at least minimize this expense when you convert a tub to a shower.
FIRST, sliding glass is generally less expensive than swinging glass. A glass door on hinges needs to be installed perfectly to work properly, and 5/8-in thick safety glass panels are very heavy and VERY fragile. Installing a swinging door glass enclosure is not something that you can DIY.
Sliding glass panels, on the other hand, can be installed by anyone with expert handyman skills. Also, sliding glass panels are hung on an overhead track. This eliminates the need to hold a heavy glass panel perfectly in place while measuring and mounting glass door hinges. You can simply measure and install the overhead track (be sure to measure twice!) and then just lift the two panels onto the track.
SECOND, prefab off-the-shelf sliding glass kits are less expensive than custom cut glass. Even a prefab glass kit won’t be cheap, unfortunately. But going with a DIY sliding glass shower enclosure kit can save ~$500 or so versus custom cut glass for a standard 5-ft wide shower opening.

Most tub to shower conversion projects don’t want a swinging glass door design anyway, since the typical 5×8-ft bathroom design puts a toilet right next to the bathtub. Converting the 3×5-ft bathtub footprint into a shower doesn’t leave enough practical clearance for a glass shower door. Space was especially tight for this project, since the shower and toilet were in their own little alcove space with an in-swing door.
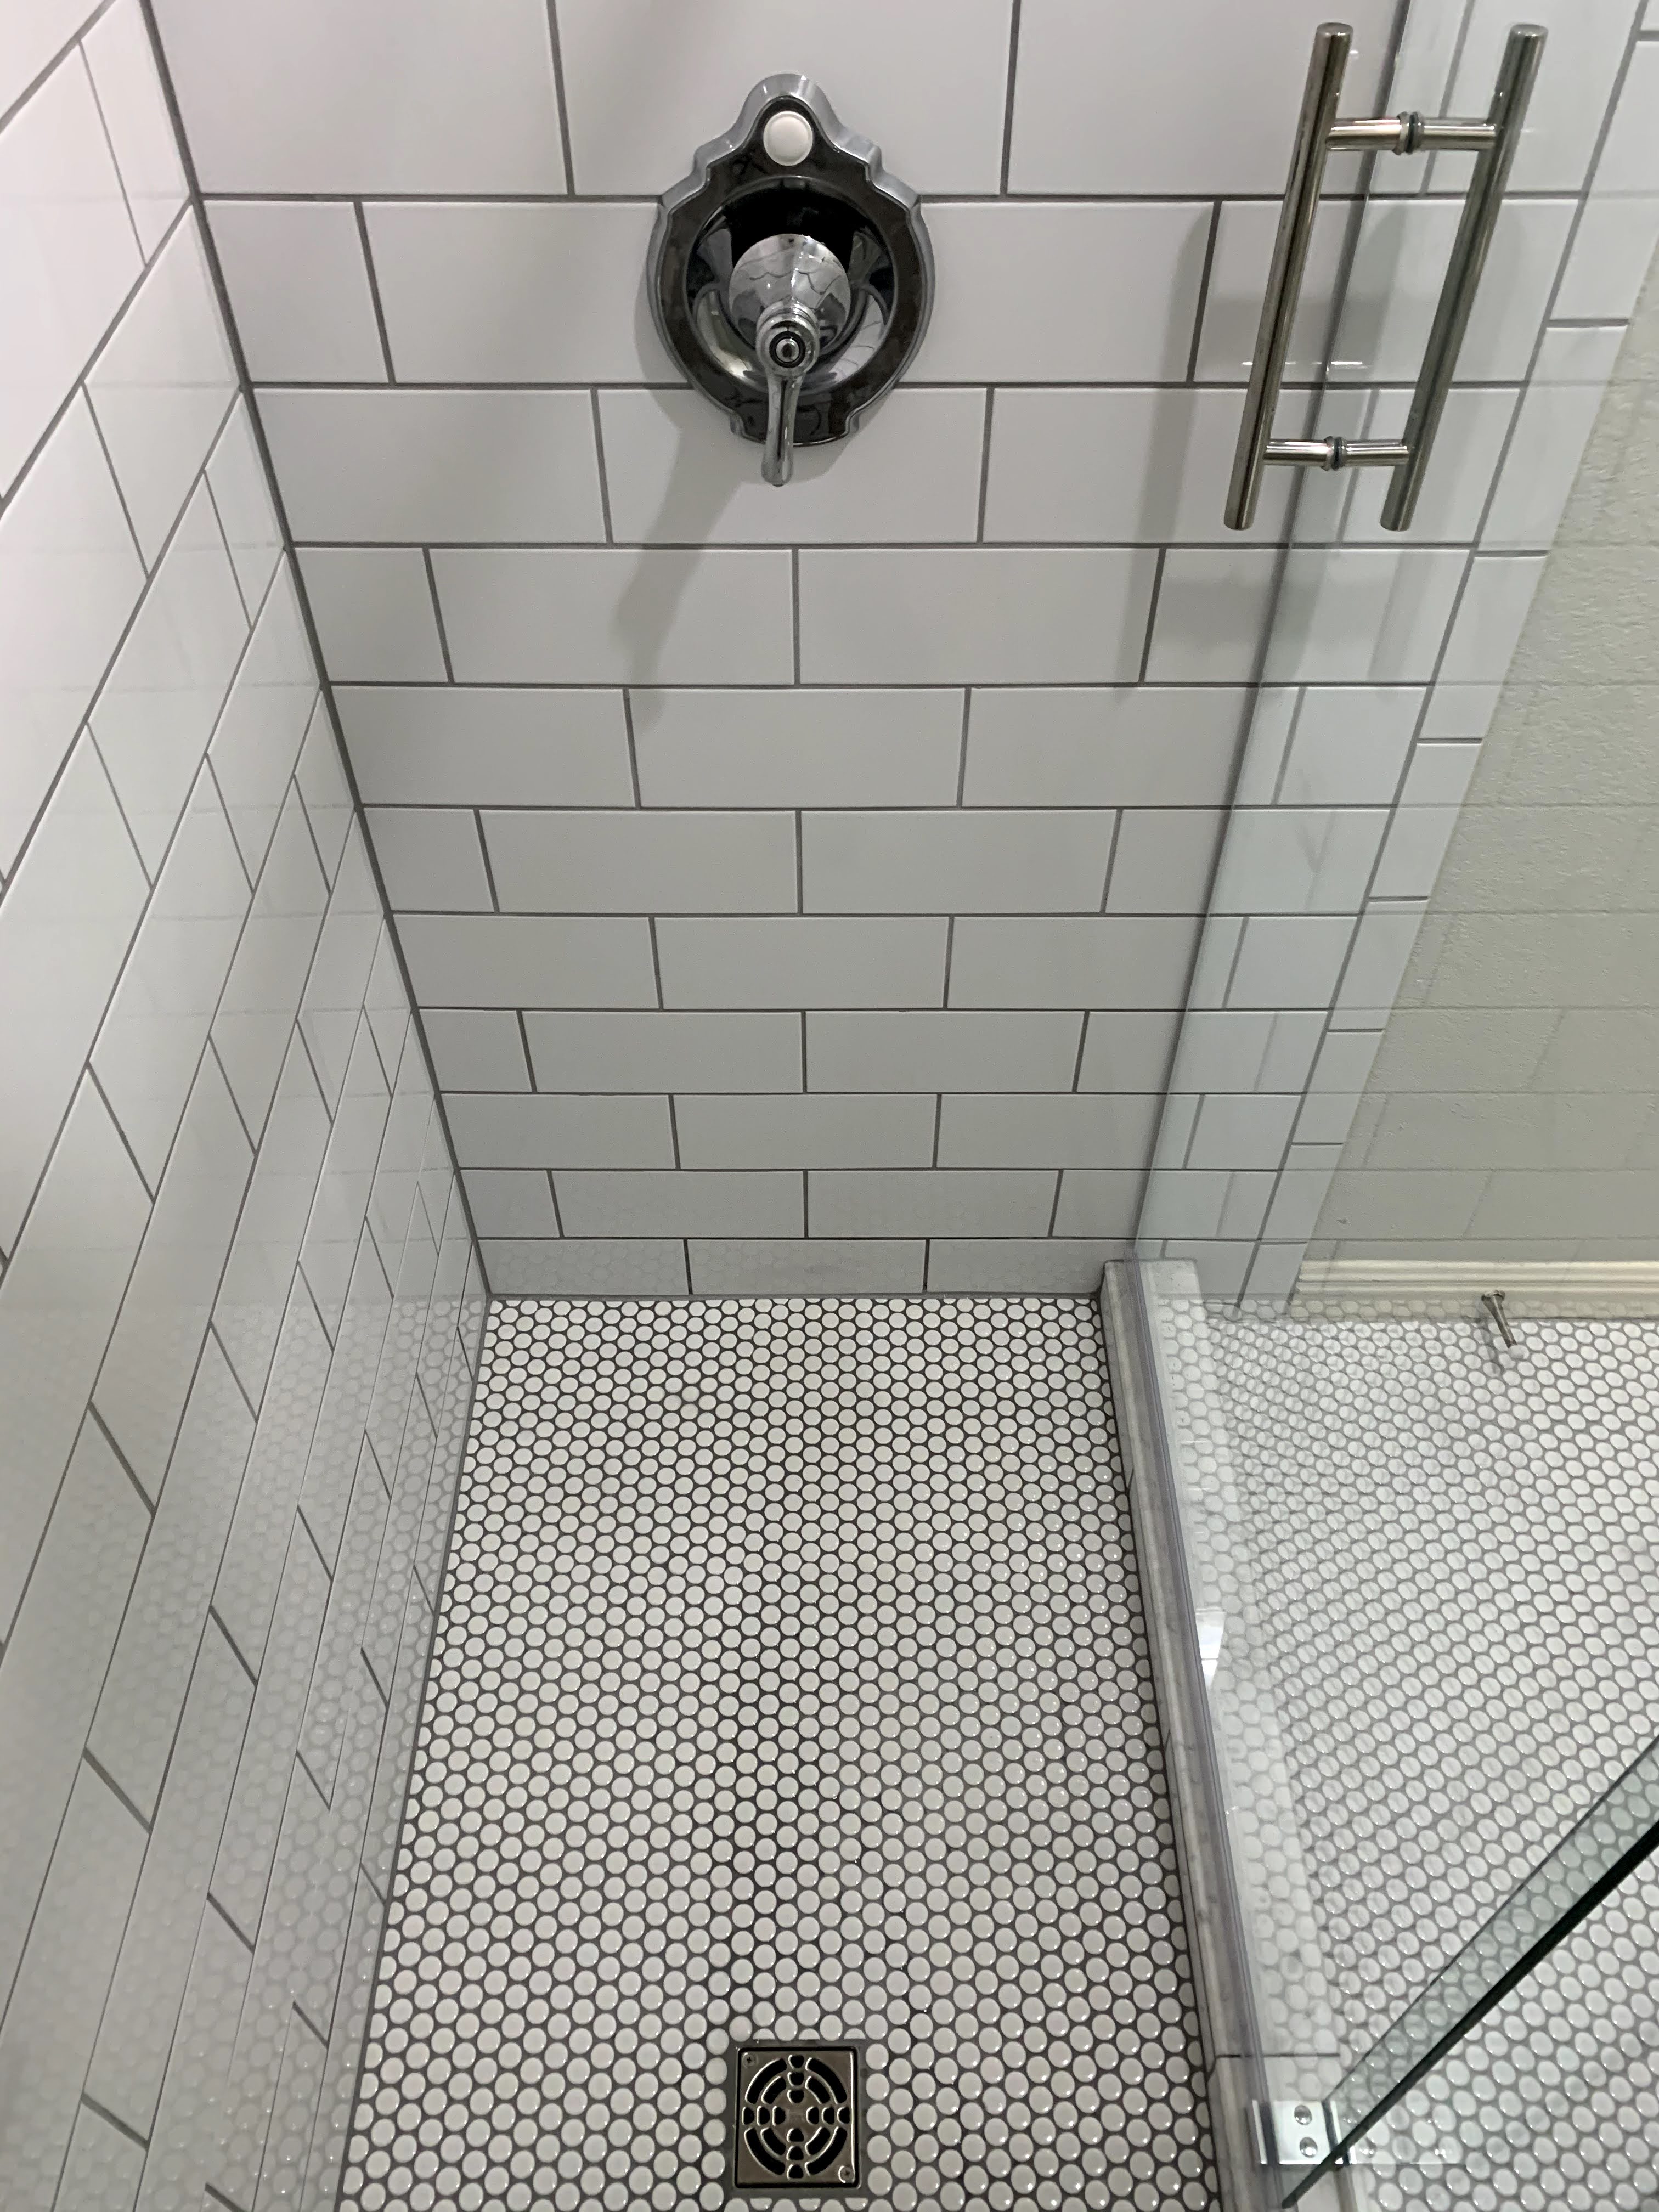
That’s why these folks chose to enclose their new shower with a sliding glass panel kit. The track and hardware matched the overall midcentury chrome design they wanted. Making the tiled shower walls perfectly plumb and perpendicular to the shower curb made it possible to forego the out of plumb adjustment plastic channels that would otherwise be needed to cover gaps along the enclosure perimeter. This made the prefab kit appear to be a much more expensive truly custom glass job.
Although designed for DIY, the sliding glass kit still took a full day to install. You can’t undo a mistake when drilling holes in tile. And tempered glass is made to be incredibly brittle. It can very easily shatter with just a tap from something hard. Don’t rush glass installation. Take your time and always measure twice!
The FINISH!
Finally, the end of this marathon post. Hopefully the detail has been helpful. Any bathroom renovation is an opportunity to be creative. You can convert a blah spare bathroom tub/shower combo to a classy custom tile walk-in shower without breaking the bank.


There were four things that made this project particularly cost-effective:
- It was a second-story job, so re-configuring the drain plumbing only required cutting into a plywood subfloor. It would have been a more expensive project if done on a first floor slab foundation.
- The supply plumbing was also super-easy to convert for a shower, since the PEX lines had plenty of slack and the clients were happy to re-use the existing mixing valve and handle/showerhead heights. Got lucky on that.
- The clients chose to use inexpensive tile and didn’t change the bathroom footprint. Minimizing tile cost is one of the best ways to keep the overall project pricetag low.
- The clients chose to use an off-the-shelf sliding glass shower kit that was easy to install. This is always a less expensive option than custom cut glass.
This project still took 14 working days from start to finish. You can’t convert a tub to a shower (especially a custom tile walk-in shower) in less than two weeks. But it’s not a project that requires months of work.
This project cost $7,000 for labor and $1,000 for installation materials (plumbing parts, backerboard and waterproofing, thinset and grout, etc). The tile and sliding glass enclosure kit added another $2,000. So the grand total for this project was approximately $10,000.
In contrast, replacing the bathtub with a new medium-quality acrylic tub and simply redoing the tile tub surround with an identical large vertical storage niche would have cost ~$8,000 total. Bathtub replacements are sneaky expensive, especially in tight second story bathrooms. It can actually save money in the long run to convert a tub to a shower when renovating a bathroom.
This walk-in shower that the clients designed will be far more convenient for their daughters to use. It will also be easy to clean. And it be a lot more appealing to future homebuyers than a generic spare bathtub/shower combo. This is how you can properly convert a tub to a shower to add value and usability to your home!