
This post describes how to install tile on a concrete slab. Here in Austin, most home foundation slabs come with cracks. Austin TX sits on a soft limestone bedrock cap. Almost every home foundation has at least a few cracks in it as a result.

If you want to make sure that your expensive new large format porcelain floor tile doesn’t also eventually crack when installed on a concrete floor in Austin, then this post is for you. It explains how to use a crack isolation membrane for a lifetime crack-free guarantee!
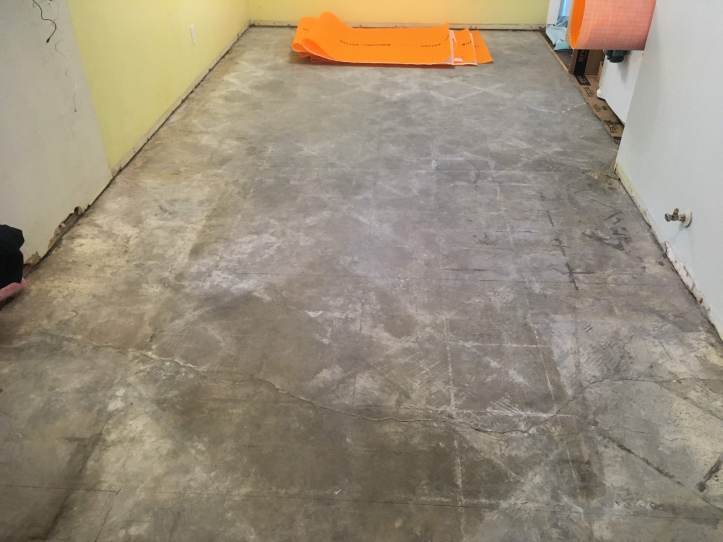
The Situation
This was a kitchen reno floor tile job. The client in this case had already done most of the hard work by removing existing cabinets and removing the original laminate flooring themselves. This exposed the concrete foundation slab of the 1960s midcentury home, and uncovered some scary looking foundation cracks.

The slab foundation had previously been leveled with a couple corners of the midsize home being raised an inch or two in the process. The foundation repair folks guaranteed that the slab would be stable from then on. However the client still wanted some added peace of mind to absolutely ensure that their expensive new porcelain 12×24 inch kitchen floor tiles wouldn’t crack in the future.
The solution? Use the best crack prevention membrane material available to install tile on a concrete floor. This will guarantee no future cracks for the tile or grout.
The Plan
The tile install steps were very straightforward:
- Install a Kerdi DITRA crack prevention membrane
- Install the tile
- Install the grout
And, done! Straightforward in theory, and in this case also straightforward in practice. You get lucky on that sometimes.
The Kerdi DITRA Install
The Kerdi DITRA crack prevention membrane material comes in rolls roughly 4-ft wide. It installs on concrete with basic unmodified thinset. The biggest install challenge for this is using the proper thinset thickness (a 1/8-in V-notch works well) and making sure all the excess thinset and air bubbles are all pushed out from underneath the membrane.
For pressing the membrane pieces fully into the thinset, start from the middle and push outward with a grout float. Then, once the membrane piece is in place and major air bubbles are all pushed out, just do a RiverDance dance-off. You’ll be able to tell that it’s well set in the thinset when almost all of the membrane has a nice grey tinge (assuming you’re following directions and using inexpensive unmodified thinset for the install on a concrete slab).


It’s easy in theory. In practice, the hardest part is the jumping around. Just think of it as a really rewarding cardio workout.
Some Tips:
Here are some do-it-yourself tips for installing Kerdi DITRA crack prevention membranes:
- Precut and lay out all the DITRA pieces beforehand. This will give all the rolled-up membrane bits time to unwind and flatten out, and make things a lot faster once you’re working with the thinset.
- FOLLOW THE INSTRUCTIONS for what kind of thinset to use. For example, if installing DITRA on concrete then use plain unmodified thinset. There’s a lot of chemistry explanation for why this is important, but here’s the quick takeaway — USE THE THINSET TYPE THAT THE DIRECTIONS SPECIFY! Seriously, don’t overthink this. Just follow the directions.
- Use plain unmodified thinset for installing the tile on top of the DITRA membrane. Don’t worry about general rules of thumb for using highly modified thinset for large format tile installs. Just use plain jane cheap unmodified JUST LIKE THE DIRECTIONS SPECIFY!
Seriously, do not overthink the installation directions. For example, using modified thinset for a large format tile install on DITRA would be a big mistake. Here’s the quick chemistry explanation for that. Modified thinset has polymer additives that need to dry through evaporation before it can properly cure, while unmodified thinset ‘dries’ and cures through a hydrous chemical reaction where the water in the cement mix is incorporated into the material.
The bottom line? If you spend extra money to use modified thinset for installing tile on top of a DITRA membrane, then you will need to wait a week (or three) for the thinset to dry and cure underneath large format tile. If you follow directions and use cheap unmodified thinset, then you’ll be grouting the next day (and still be getting all the crack prevention goodness of the DITRA).
The Tile Install
Installing handmade porcelain ceramic floor tiles can be quite a challenge. This is because porcelain tiles are often not actually completely flat. In industrial production, the kiln firing process creates stress in the tile material, which then causes the tiles to bow upward or downward somewhat while cooling.
Especially large tiles will make this inherent irregularity worse. For example, quite a few of these 12×24 inch tiles were slightly concave (bowed up at the short ends by up to 1/16-in) or slightly convex (bowed down at the ends). This made installing the tiles flat to one another kinda difficult. But, having a nice flat surface to start with makes it possible to at least get the tiles as flat to each other as can be.

Using a 1/8-in or larger grout line width gives just enough play to make even not completely flat tile still appear flat to itself with some install care.
More Tips!
Here are some additional tips to install tile on a concrete floor using Kerdi DITRA for crack prevention.
First, buy double the amount of thinset you think you’ll need. Remember that you’re going to need to fill up all those waffle holes in the membrane before even getting to troweling on the normal ~1/4 to 1/2-in of thinset that’ll go under the tiles themselves. DITRA membranes are thirsty. But, since you’ll be using inexpensive $6/bag unmodified thinset for the job, it won’t add much to the install price.
Second, be certain to burn enough thinset into the membrane to completely fill up all the square waffle holes! This is very critical to ensuring that the membrane can do it’s job of preventing the tile from cracking. A trick for this is to mix the thinset wetter than usual so it will flow more easily. This will also help keep the thinset from sticking to your trowel and pulling out of the waffle holes.

And third, if time isn’t a factor then think about a two step process for your install. First, go across the entire surface with thinset to fill up all the DITRA membrane waffle holes with thinset (scraping it all flat as you go). Wait overnight for that to fully dry and set, and then install your tile the next day.
Grouting and Finishing
The client chose a light grey platinum-colored grout that really nicely accentuated the dark slate color and slight texture of the tiles. Since it’s a kitchen, it got sanded grout despite the skinny 1/8-in grout line width.


You always want to use sanded grout for tiles in high-traffic (and likely spill) areas like kitchen, hallway, and bathroom floors. If a contractor tries to sell you on unsanded grout for a floor install, give ’em a side-eye and ask ’em why.
The Result?
This job to install tile on a concrete floor went really well. The result was flat tiles with grout lines straight and true!


The job supervisor was definitely pleased with the finish!
