
This project was for clients who wanted to turn a builder-grade 1990s -era master bath into a stylish contemporary space. The trick was how to make a budget bathroom renovation look much more expensive than it actually was.
Any major reno project isn’t going to be cheap if done right. You can however get the most for your money by making smart design and materials choices. An expert bath renovation will also add to your home’s value and reduce time on market when selling. For example, which of these two bathroom showers would YOU rather buy?


This post describes how to get expensive-looking bathroom renovation results with a reasonable budget cost. Would you like to learn how to avoid real world HGTV home reno porn problems? Then read on for tips and advice from a budget bathroom renovation project that was a true value!
The Before: Welcome to 1992
These folks had already replaced the original builder-grade plywood and faux marble vanities with modern wall mount cabinets and porcelain sink tops. They had also already installed new mosaic tile flooring. But the fake marble tub and grungy shower insert were the main problems.
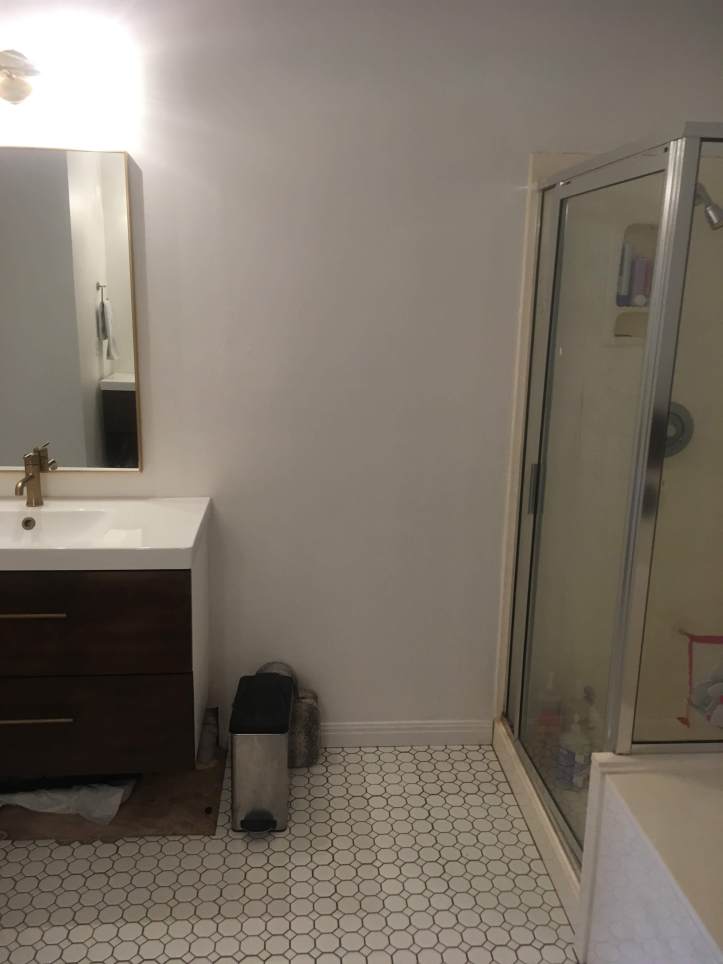

Huge oval soaker tubs that date back to the Clinton administration are the worst. It is impossible to fill an enormous 60gal second-floor tub with hot water from a 50gal water tank in the garage. This is why no one actually uses old flat-bottomed ‘garden style’ oval bathtubs. Instead, they mostly just get grody while getting used for just storage.

There are three tricks for a successful budget bathroom renovation. First, keep the materials simple. Second, keep structural changes to a minimum. And the third? Get expert installation help!
Minimize Costs: Use Simple Materials
The clients kept material costs down by using basic white ceramic subway tile. They also chose a relatively inexpensive acrylic drop-in bathtub that was both an online closeout and cleverly designed for soaking with only 30gal of water.

The clients also chose Delta plumbing fixtures and trim for both the shower and tub. This also minimized reno materials costs. Any fixtures that you can buy off the shelf at a big box store will be less expensive than designer.
Finally, these folks also chose to use natural stone pieces for the shower curb, window sill, and kickwall ledge. They kept costs on that element low by using remnant pieces. Stone countertop install shops will often have leftover pieces from kitchen counter projects that they will sell at discount (cut and polished to specs) just to get rid of ’em.
Minimize Costs: Use Smart Design
Redoing every bit of plumbing and knocking out load bearing walls are two of the most expensive items you could add to a bathroom renovation. So, the clients chose to keep the original tub and shower locations. This kept both the plumbing and carpentry labor to a minimum for the new tub and shower installs despite enlarging the shower space and moving the shower fixtures to a different wall.
It’s relatively easy to move or add non-loadbearing walls or kickwall partitions. And it’s also relatively easy to reconfigure drain and supply plumbing in a second-story bathroom so long as you’re not completely changing the previous footprint.
The before and after pics on this project look pretty dramatic. But as you can see from the masking tape lines that the clients used to visualize the layout change, the new shower and tub locations really didn’t change much.


Keeping the original basic layout intact is key to a budget bathroom renovation.
Don’t Skimp on Pro Install Skill!
Remember that you can save money on a reno with careful planning and smart decisionmaking. You CANNOT save money by cutting corners or skimping on skilled labor. Cheap plumbers, carpenters, or tile installers will end up costing you much more in the end.
Instead, budget renovating means making smart money saving decisions on design and materials. You will then have the money to spend wisely on skilled pro installation labor. The rest of this post gives step-by-step detailed advice for what that looks like.
Step ONE: Demo
Demo thankfully revealed no nasty surprises. There had been no significant previous moisture leaks, so there was no dryrot to deal with. The old cultured marble shower panels and tub were also pretty easy to crack into pieces with just a hand sledge.


Discovering sketchy plumbing or unanticipated previous water damage will add unexpected expense to a budget bathroom renovation project. This though was a nice easy boring demo, just like I like ’em!
Step TWO: Framing
Reframing a bathroom space to add usability features like inset niches, enlarged shower spaces, and custom height kickwalls is pretty easy when the studs and subfloor are exposed. The biggest challenge is to make sure all the framing is perfectly square and plumb so that the tile pattern doesn’t end up looking wonky. You also want to carefully think ahead to ensure that things like niches and kickwalls are framed to complement the eventual tile install design dimensions


This is where even a little bit of a screw-up can lead to big problems later on. For example, the side support for a drop-in style tub needs a very solid frame. An acrylic tub also needs a layer of poured plaster or concrete underneath it. Otherwise the tub will flex when filled with water and the grout around the tub will crack as a result.
I can’t stress enough how important it is to plan ahead at every renovation step. If you are working with separate carpenters, plumbers, and tile installers, then it is VERY important to make sure that they all understand what the final tile design and pattern needs to look like. Miscommunications will at best result in off-centered plumbing fixtures, wonky tile cuts, and unbalanced grout line patterns. At worst, miscommunications at this step can result in having to pay for a redo.
Step THREE: Plumbing and Waterproofing
Installing the drain plumbing and waterproofing for this custom shower was very straightforward. Getting access to shower drain plumbing is easy in a second-story bathroom. You just need to carefully cut out a section of the plywood subfloor to expose the drain pipe and p-trap.

This is what the shower base looked like with the Kerdi drain in place, subfloor patched, and everything ready for the concrete deckmud shower base installation:

When installing a sloped concrete shower base on plywood, it’s best to first put down a layer of 2mil plastic with wire mesh above. This prevents the plywood from sucking moisture from the deck mud concrete mix too quickly and also provides ‘rebar’ for strength. Both are cheap and easy extra steps to help ensure that the resulting concrete base is strong and flex-free.

Here is what the shower space looked like after RedGard waterproofing for the concrete backerboard walls, but before Kerdi waterproofing for the shower base and curb:

There are three different ways to effectively waterproof a shower floor “pan”. The two traditional methods (fiberglass or PVC) would have been expensive and difficult to use for this shower installation. Custom fiberglass waterproofing liners need to be fabricated in place and are expensive if done right. And flexible PVC waterproofing liners are difficult to wrap seamlessly around oddly angled shower curbs.
Using more modern Kerdi fabric to waterproof a shower base is more effective, more flexible, and less expensive than traditional fiberglass or PVC methods. It’s a method that is particularly well suited for oddly shaped showers, since Kerdi seams that simply overlap by 1.5-in are guaranteed to be waterproof for life.
The bottom line? You never want to work with a custom tile shower installer who does things in a particular way just because “that’s the way it’s always been done.” Instead, you want to work with an installer who understands the most modern materials and methods for guaranteeing leak-free results.
Step FOUR: Shower Wall Tile
The clients chose 4×16 inch white ceramic tile for this project. Normally, it is not recommended to install ceramic tile this size in a full offset subway pattern. Since ceramic tile is made from a thin layer of porcelain on top of what’s essentially a clay pottery layer, long skinny ceramic tiles are not actually completely flat. Individual tiles will be bowed up or down just a bit, which can make it very difficult to get a completely flush install.
But, not impossible!


You can make even slightly warped surface tiles all nicely flush to each other with some skill and added install time. Selecting tiles carefully, backbuttering each tile individually, and being okay with 1/8-in or wider grout lines are the secrets to flush success for this kind of tile and pattern.
The bottom line? Always make sure that your tile contractor can guarantee the final result that you want BEFORE the installation work starts. Don’t assume that a particular design will be easy to accomplish just because some rando Pinterest picture makes it look simple. Every building material has limitations, and a pro installer will know what’s possible (or impossible) to achieve with a particular material. The key is to make sure that everyone clearly understands the final finished design goals.
Step FIVE: Shower Floor Tile
The clients chose a bold contrasting design for their new shower. Their vision was for white tile shower walls with off-white grout, but a floor of black hexagonal mosaic tile with black grout. And, they envisioned a first course of wall tile that would also be black on black.


This is why it was really important to get the shower floor slope perfect. The bottom course of tile along the walls would be completely different than all the rest of the wall tile. Any wonkiness at the perimeters would be really unsightly for the finish. But with planning and attention to detail, the floor and perimeter tile worked out perfectly.


Step SIX: Shower Curb
The clients also wanted to add additional design flair. So, they chose to use some custom cut marble stone remnant pieces to cap the shower curb and kickwall top. We also used this marble for the tub surround windowsill and for the inset shower niche. This made the whole remodel design look purposeful, unified, and classier than just slapping ceramic tile on every surface.

Using remnants instead of custom-order pieces also saved on materials cost. And, measuring and installing the straight rectangular niche and wall top pieces was easy since square dimensions are simple. The shower curb was a different matter though.
Having stone pieces custom cut to fit complex shapes and angles can be pretty complicated. For example, the curb needed two different pieces that had to both fit together seamlessly and be pitched inward at a very precise angle.
There are a few tricks to getting complicated stone pieces precisely cut for a complicated install challenge. First, it’s a really good idea to make an actual full-size template out of cardboard for the stone fabricators to use. This ensures no miscommunications for complicated cuts.


And second, leave an easy option for on-site size adjustment when joining two stone pieces at a complex angle. In this case, one of the two curb pieces would have one end buried in the tile wall. So, I made the template for that piece a bit longer than needed on the square-cut end. A quality full-size 10-in wet saw will cut even solid stone cleanly. Using this trick, I was able to precisely fit the two marble curb pieces by cutting off the unneeded material onsite.


The result was a true custom fit finish for a classy marble shower threshold highlight.
Step SEVEN: Tub Surround Tile
The tile that surrounds a soaking tub (as opposed to a tub/shower combo) is basically decorative. It’s essentially just a backsplash, but it does need to look good. So, you need to plan a layout that will be balanced, centered, and look purposeful rather than haphazard.

Again, careful planning is what makes a successful final design result. Notice how the shower wall perimeter (including the kickwall) ends in alternating full and half tile pieces, and how every corner looks like a full tile has been smushed into it? This nearly perfectly balanced install pattern didn’t happen by accident.


The bottom line? A perfect design result starts at the very beginning of a tile project. You have to be certain that the framing, plumbing placement, and even backerboard installation will all result in final tile install dimensions that will make the finished design goal possible. This is why you can’t skimp on pro installation skill with a budget bathroom renovation project. Skilled tradespeople can make inexpensive ingredients shine.
Step EIGHT: Grouting
The clients chose an off-white grout color for the tub surround and shower walls to complement the white ceramic subway tile. This would normally make grouting a breeze. But the clients also chose a contrasting black grout for the shower floor and first row of shower wall tile.

It is not possible to install contrasting grout colors adjacent to one another in a single day if you want to get great results. Therefore, grouting took two days instead of just one.
The bottom line? Even seemingly minor design decisions can potentially add days to a renovation project timeline if you want great results.
Before versus After!
The before looked like this:


And the after now looks like this!


The clients will finish with a frameless glass install even though the enlarged shower space and slightly raised kickwall would prolly make just a single small glass panel work. They saved enough on the rest of the project to make an expensive glass splurge still fit their budget though.

The bottom line? This relatively inexpensive but still classy looking bathroom renovation result was only possible with careful planning and great communication.
This is another example of how you can save money by making smart reno decisions.