
When your tile is a challenge to install flat and level…
…then you need to make the right install choices! This post describes how to install a handmade tile backsplash to make the result worth the high-end tile expense. This previous post explains why handmade tile is often challenging to work with, and this post explained the design process for this backsplash. So here I’ll get down in the weeds describing how to install handmade tile for a perfect backsplash result.

Read on for tips to get a fantastic backsplash that will add value, usability, and joy to your kitchen!
Step ZERO: increase your outlet joy!
Installing any kitchen or vanity countertop backsplash means that you’re starting at bare drywall. And it’s easy to cut through drywall to access wiring. And, I have never met a countertop that couldn’t use at least some additional electrical outlets.
In this case, the clients’ 1970s -vintage kitchen had just two outlets. These outlets also weren’t in convenient locations. Whomever had installed the wall cabinets previously had at least added undercabinet task lighting. But there were no outlets at the countertop perimeter for appliances like coffeepots that always live in these corners.

So, add some outlets! It is super easy to add additional outlets on an existing circuit. Seriously, adding additional outlets to your countertops is a no-brainer for convenience and added value.


You won’t even need to finish the drywall afterward, since the backsplash tile will cover it. Simply make sure that the rough patched drywall is securely screwed to the studs and completely level.
Step ONE: use the correct adhesive
It’s hard to beat plain basic unmodified thinset for most wall tile install projects. It works for both wet applications like showers and also dry situations like backsplashes. Plain unmodified thinset also works for adhering tile to both concrete backerboard and drywall substrates. It’s also the least expensive tile adhesive at ~10$ per 50lb bag.

However, just about any thinset will begin to “skim over” pretty much instantly when spread on drywall in a thin coat. The drywall will immediately start sucking moisture out of the thinset mix from behind, while the open air will cause a dry film to develop on top. Both of these things will prevent a good bond with porous tile and can result in tiles literally popping off the wall once the thinset fully cures.
Normally you can work around this thinset limitation by working quickly to stack tiles on the wall before the thinset gets too dry. But remember that handmade tiles have finicky size, shape, and thickness variations that makes it nearly impossible to slap them up quickly with good results. Also, handmade clay ceramic tiles are very porous on the backside.

As a result, mastic is often a good choice to install a handmade tile backsplash that will require a long working time to get each tile perfectly placed. Mastic is basically organic glue, and so not appropriate for a wet area application like shower or tub surround walls. However, a countertop backsplash is decorative. If your kitchen counter ever sees enough moisture to dissolve mastic adhesive, then you’ve got WAY bigger problems!
I used basic “Mapei Type 1” mastic for this project. This adhesive has an annoyingly long dry and cure time (48-72hrs, as opposed to 12hrs for thinset) but therefore also stays workable for hours before you have to worry about it skimming over on a wall. This is a tradeoff between workability (giving lots of time to play with getting perfect placement of each individual tile during installation) versus cure time (requiring a full weekend of letting everything dry and cure before grouting).
Step TWO: backbutter each tile
Any thinset or mastic adhesive requires two things. It must be firmly bonded to the substrate, and it must be firmly stuck to the tile. Firmly bonding mastic to drywall means getting full coverage. Simply use a notched trowel to groom a nice even continuous layer without any thin spots.
Firmly bonding the mastic to the back of each tile can be more difficult. It requires getting a full tight bond. Some tile types like solid porcelain or glass are perfectly flat and very dense with no pores on the backside. These types of tiles will therefore push fully and evenly into the adhesive.
Handmade clay tiles, however, are not completely flat on the backside and have a very porous backing. Just pushing these tiles into the mastic or thinset will leave voids and trapped air that prevents a good lasting bond. The LAST thing you want is to have poorly adhered tiles start popping off the wall as the adhesive dries.

The solution is back-buttering, which is exactly what it sounds like. Before putting each tile in place, first ‘butter’ a thin layer of the mastic adhesive onto the back of the tile with a drywall knife. This fills all the little pores and seams on the backside of the tile for a tight firm bond.
Back-buttering adds time, since it means futzing with each individual tile before putting it in place for more futzing with grout line gaps, etc. However, back-buttering is essential to install a handmade tile backsplash for a solid finish guaranteed to last. And you’ll be installing each handmade tile individually anyway.
Step THREE: keep the tiles random

Any handmade tile will vary in appearance from tile to tile. This is a feature, but only if the variations appear to be truly random when the tile is actually installed. Human brains are really good at making patterns out of randomness. This is why making the appearance of randomness actually takes A LOT of preplanning work.
It is not enough to just shuffle tiles and hope that the result seems random to the eye. There is a difference between randomness and chance. For example, if you flip a coin 5 times then you’re actually just as likely to get five heads in a row as you are to alternate heads and tails.

If you want the variations in your finely handcrafted ceramic or natural stone tile to appear completely random, then you can’t leave things to chance! First, presort all the tiles into piles of “lighter to darker”, or “more to less irregular”, or whatever quality you’re looking to randomize. Then, examine EVERY tile before install to make sure that it doesn’t contribute to an accidentally emergent pattern.
Step FOUR: grout carefully
Ceramic veneer tile is usually easy to grout. Grout haze does not adhere well to smooth surfaces. However, this particular handmade tile had a cracked glaze surface that could have absorbed grout to make for a really ugly finish. The presealed Mapei Ultracolor FA grout that I always recommend is very gentle on tile and doesn’t leave a difficult to remove haze. But it’s also really good at penetrating into even small joints and cracks, and so can fill natural stone tile pores and handmade tile glazing for a not great finish.


So if you need to protect a natural stone or other finicky tile surface (like a textured tile, matte finish tile, etc) when grouting, then use a grout release product. It adds a few hours of install time to spread a couple layers of grout release onto the installed tile and wait for it to dry. But the water soluble waxy coating it provides will ensure that the grout won’t discolor the tile surfaces.

Grout release is like insurance for installing a handmade tile backsplash. If you think you even might need it, then get it! Handmade tile is expensive, so you need to protect it throughout the install process.
Step FIVE: caulk precisely

You cannot pack grout into inside seams along countertops. Same goes for tub surrounds and inside tile seams in showers. Grout is fantastic for staying in place between tiles on a flat surface. It will, however, eventually crack and crumble out of inside joints. So you need to finish these installations by installing caulk in the seams. Caulk is flexible enough to expand and contract a bit even when fully cured. It will fill inside seams without cracking or chipping out.
It is however important to use the correct caulk and install it with precision. DO NOT just go to the big box paint section and get plain ‘ol painters caulk or plain jane silicone caulk! Instead, go to the tile section and get proper color-matched grout caulk. Both Mapei and PolyBlend (the two big grout manufacturers) have specialized caulks that match every grout color they offer. Use sanded siliconized caulk for a kitchen countertop backsplash. This is a very durable caulk type that’s both waterproof (so it’ll resist stains) and that can hold up to any scrubbing (because it’s very dense with the added silica).
You then need to install the caulk with precision. DO NOT just squeeze a bead into the seams, lick your finger, and hope for the best. This will result in an uneven mess that’ll make an otherwise fantastic tile job look like junk. Instead, take the time to carefully mask off your caulk joint lines with tape. The prep will be an annoying pain, but the actual caulking will then be a breeze. With everything masked off, you can simply smooth all the seams to precise thickness without worrying about the mess. Then once everything is smoothed out, simply peel up the tape for perfect lines.


The Finish!
Perfection takes time, patience, and care if you want to install a handmade tile backsplash. In this case, “perfect” meant precise randomness with overall even grout lines, an overall balanced layout, and an apparent random layout from one tile to the next. This purposefully counterbalanced the otherwise regimented precision of the rest of the 1970s -style modernist kitchen design.
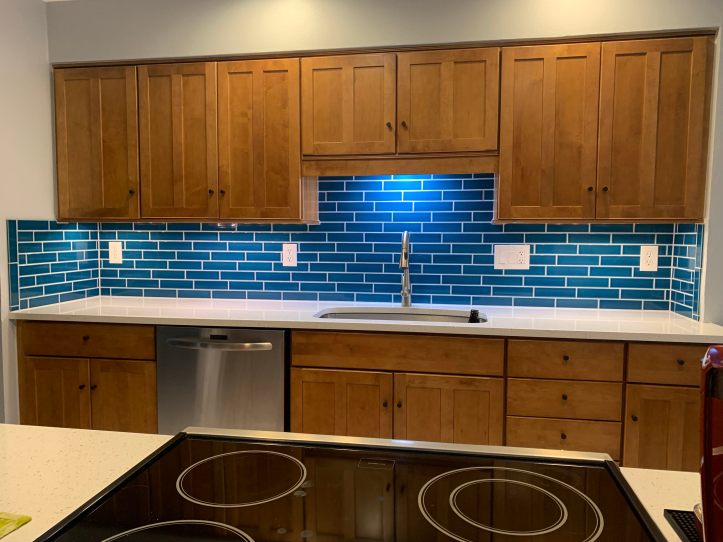
Welcome to Austin Texas, where good taste from every era has a home!


This is how you properly install a handmade tile backsplash. Handmade tile is very expensive. So you can’t rush the process. But it also isn’t rocket science. Simply following key steps and using proper materials can ensure a perfect result every time.