
If you are trying to decide on a new custom tile shower design, then get ready for some decision paralysis. Looking at different tile sizes, colors, materials, finishes, and layout options online can be dizzying. The amount of choice can be overwhelming.
One solution is to first start with just a few basic pracitical goals. Most people enjoy a custom shower that is relaxing, easy to clean, and built to last for a lifetime of trouble-free use. So, if those practical goals appeal to you, then this can really narrow down your specific tile and other choices.
This post gives an example of how to make very easy and clear custom tile shower design choices. My clients wanted a new shower with a farmhouse Texan feel but with near maintenance-free finishes. If you would like that too, then read on for tips!
The Before
This 1950s house in the Crestview neighborhood of Austin, TX, had been flipped back in the early ‘aughts. The flipper had done the resale renovation relatively well, which was fortunate for the homowner clients. For example, the previous shower installer had already replaced the original 1950s cast iron drain flange with a modern one. So, that was nice. The home flip designer, however, unfortunately decided that chunky limestone tile would be a great choice for a super texan look.


Natural stone tile is generally not a good choice for a shower. Limestone tile in particular is a really poor shower tile choice unless daily upkeep and cleaning is your idea of a great time.
No tile is waterproof. Natural stone tiles like marble, slate, limestone, etc, however are the opposite of waterproof. Limestone in particular is especially porous. This is something that folks in Austin, TX, should definitely already know. For example, the fractured porous limestone bedrock below Austin is the whole reason why Barton Springs is a spring.
Limestone tile will take a long time to dry out between showers. This provides a great habitat for surface mold and mildew growth. It’s also a very light and brittle stone that doesn’t take grout well and can literally fall apart over time. This results in open gaps and seams despite repeated rounds of grout maintenance and layer after layer of caulk. Finally, limetone tile will leach out mineral deposits. This results in a white chalky scale that is especially hard to remove without caustic cleaners.


If your shower is properly waterproofed, then any problems with the surface tile is just aesthetic. But a limestone tile shower will become an aestherically bad eyesore espeically quickly without literal daily upkeep. And a gunk-collecting fully framed shower door will add to the cleaning nuisance.
The Design Goals
These folks were wanting a new shower that would be Texas stylish but also super easy to keep clean. Happily, this was easy to make happen with just four design criteria:
Put the waterproofing directly underneath the tile! Seems like a no brainer, but conventional minimum code approved shower construction doesn’t do this. That’s why I use more modern materials and methods to put shower waterproofing right underneath the surface tile, where it can be most effective.
Choose an easy to clean tile. Natural stone or matte finish tiles will actively collect and hold onto soap and oil residue. So instead, choose solid porcelain or porcelain veneer ceramic tile with a smooth finish. This type of tile will collect less soap and oil residue to begin with, so it will be easy to keep clean.
Use an easy to clean grout. I’m a huge fan of Mapei’s “Ultracolor Plus FA” line of grout for easy maintenance. It’s a superdense presealed grout that works with any tile type. And if you want shower grout to be especially easy to maintain, then stay away from bright white or dark black/brown shades. Instead think about using neutral grey, silver, or light brown shades. These grout colors will hide soap and oil residue discoloration really well. There is a reason why “honda silver” cars are so popular!
Install truly frameless glass. A framed or semi-framed shower glass enclosure is a little cheaper initially. But metal framing all around shower glass will be hard to keep clean and not showcase your (hopefully excellent) new tile work. There is only a couple hundered dollar difference between a framed glass kit and a custom frameless glass shower door once you include installation. Frameless glass is a sneaky inexpensive and convenient stylish upgrade for a custom tile shower designed to last a lifetime.
The Material Decisions
This is how focusing on everyday livability factors can really help to narrow down material options. If you focus on the goal, then it can be a lot easier to pick the path.
These folks chose a glossy smooth white ceramic veneer tile with a wavy irregular finish for an organic farmhouse look. Despite the slightly irregular dimensions, it’s still possible to get tight overall 1/8-in grout lines with tile like this if the wall substate is dead flat and your installer takes their time with the work:

For a bit of Texas -style flair, the clients chose an antique bronze finish for their new shower hardware. All tile needs some kind of bullnose or metal trim to cover cut edges. Metal trim in particular comes in a wide variety of finishes. This made it easy to coordinate the tile trim with some old-timey Texan type trim flourish.
Finally, these folks chose a porcelain ceramic penny tile mosiac for their shower floor that would also be easy to clean with a natural organic look:

Porcelain penny tile is a great choice for shower floors because it hides seams well, is easy to clean when paired with quality presealed grout, and makes a great grippy nonslip surface for safety.
The Demo and Rebuild
Focusing on pracitcal everyday design goals (Texan inspired but easy to clean) really helped these folks to narrow down their specific tile and trim choices. And demo revealed just how poor materials choices and outdated install methods had conspired to make their original custom tile shower design a mainteneance nightmare.
Conventional old school shower installs use a flexible vinyl PVC liner for a waterproof barrier. Problem is, you can’t tile on plastic. So, a conventional shower floor has a couple inches of drypack concrete underneath the surface tile to both form the shower floor slope and create a crack-free tileable substrate.


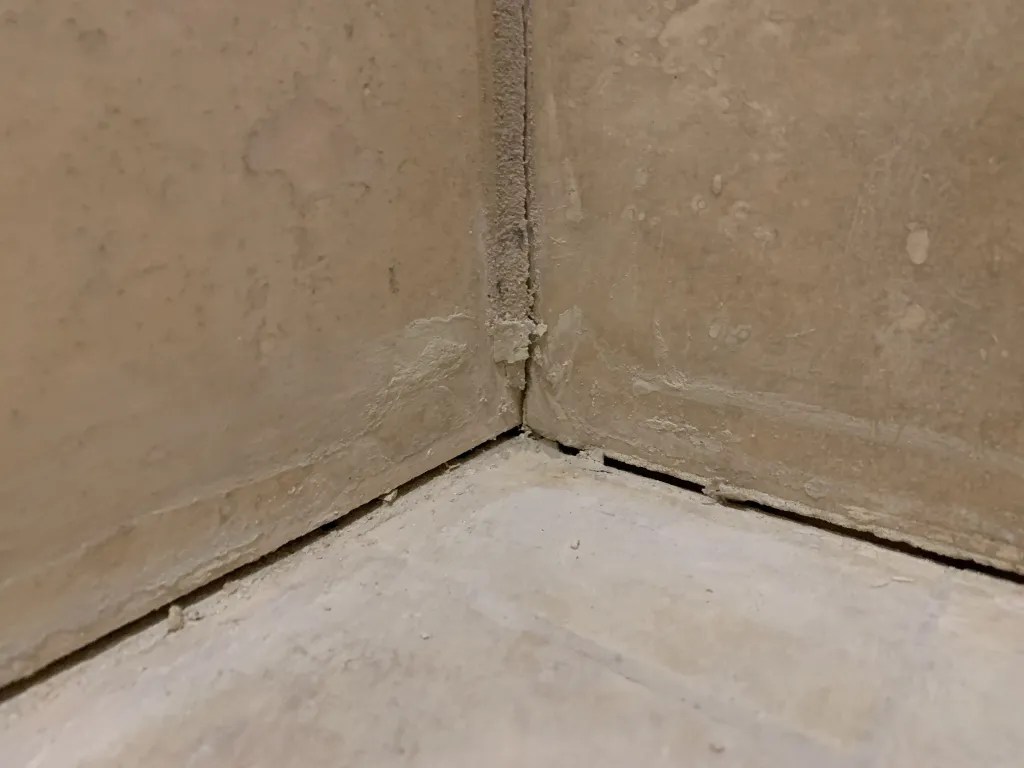
Using a thirsty natural stone tile like limestone for a shower floor creates a permanently moist concrete layer. And when the pvc vinyl or fiberglass waterproofing “pan” isn’t properly presloped, this ensures that water will wick into the wall framing all around the shower. The water damage is always especially bad at the shower threshhold.


Traditional shower waterproofing assumes that the moisture absorbed by the surface tile and grout can evaporate back out in between uses. But there are lots of ways that this 1970s -era shower waterproofing can fail (just the pics above illustrate three of these). And trying to seal or caulk the surface tile will only make matters worse by more effectively trapping this moisture in the shower walls and base. This all creates a long-term dryrot fungus mess.
If you want a watertight shower, then put the waterproofing directly underneath the tile. And if you want a really easy to clean shower, then also don’t use porous natural stone!
The Waterproofing
Here’s a photo montage of how to re-do a tile shower with proper framing and continuous waterproofing throughout.


Concrete backerboard with a triple coat of RedGard elastomeric waterproofing for the shower walls is far superior to the code minimum of just bare backerboard with a plastic sheet vapor barrier behind. It ensures that any moisture passing through the wall tile and grout will not go beyond the thinset layer.
And Schulter Kerdi waterproofing fabric for the shower floor makes for an especially dry shower install. Conventional old-school shower install methods put the waterproofing layer underneath several inches of porous drypack concrete. Kerdi, on the other hand, puts the waterproofing layer directly underneath the shower floor surface tile and grout. A Kerdi waterproofed shower base will be far easier to keep clean from surface mildew no matter what tile you use.
Tile and Trim
Here is a photo montage of the tile and metal trim install process.


It is especially critical to make sure your backerboard substrate is dead level for a wavy tile install. Any deviation from perfect flat will make the slight natural lippage inherent in wavy tile turn into a haphazard mess. Metal trim is also quite unforgiving. It takes careful planning and exacting detail to install a custom tile shower design to a precise 1/8-in grout gap tolerance at every joint and seam.
The Finish!
Here is a photo montage of the final install, ready for the glass door finish:


This custom tile shower design has proper waterproofing, a smooth ceramic veneer surface, and dense presealed grout. It will provide a lifetime of easy cleaning trouble-free use. There are lots of other tile types, patterns, colors, and trims that the clients could have used to achieve the same results. But focusing on pracitical goals (make it easy to clean and durable for a lifetime) really helped to make their tile and design decisionmaking manageable.
And my clients were really happy with the result!
Read the review