
The upside of an outdated kitchen…
…is the low bar for making it better! These folks had a quite outdated 1980s vintage kitchen space in Pflugerville (a town just north of Austin, TX) that was nicely large and worked okay, but wasn’t a very happy place. It was dark, uninspired, and not completely functional for a growing family. They needed an inexpensive full kitchen renovation to update the space without robbing their kids’ college savings accounts.


A full to-the-studs complete full kitchen renovation redo for a large ~200ft2 kitchen with lots of counterspace is an expensive project. One cost-saving trick is to keep the existing cabinets (see this post for an example). However, these folks really wanted to change the sink location which required tearing into the main cabinet wall — an exterior first story wall — to rejigger the plumbing.
The clients also really wanted some hardwired undercabinet lighting, which wasn’t possible with their existing kitchen wiring. Plus, the existing fluorescent tube lighting was terrible and had to go. Keeping the existing kitchen cabinets therefore wasn’t an option. Luckily, the clients had a few cost saving tricks of their own!
The Ikea Hack Savings Plan
Having previously worked customer service at the local Ikea outlet, the clients knew all the insider tricks for maximizing Ikea cabinet savings. Getting discount cabinets is the main trick for getting an inexpensive full kitchen renovation. Here’s a rundown on their tips:
- Watch for their (not well publicized) biannual(ish) 15-20% kitchen sales
- Don’t worry about backorder delay — plan ahead and use Ikea pickup flexibility as a free storage feature
- Use the Ikea online planning tool to fit their cabinet options to the space you have
- Visit an Ikea store to talk with an experienced kitchen rep in person, for free, to get a sanity check on your plan (best to do in the early afternoon when they’ve got plenty of time for you, and with a clear detailed kitchen layout plan drawn on graph paper and measured to within a quarter inch)
- Use the Ikea order picking and delivery option (worth the added price for the convenience of not having to rent a truck and wait in the customer service line for pickup, plus if your order turns out to be missing anything at all then you’ll get free additional delivery for those items)
The Ikea measuring service, in-home “design consultation” service, cabinet assembly service, or installation service? According to these Ikea customer service insiders, none of these additinal services are worth the added cost so long as you’re working with someone who has prior Ikea cabinet installation experience.
The Design Process
This was a very easy step for me. The clients were already totally on top of the new kitchen design and materials sourcing, with me just needing to take care of demo, prep, and installation. And, since I’d already figured out all the Ikea cabinet install secret handshakes on previous jobs, install was a cinch.
Another design trick that the clients used for cost savings was to not use granite, quartz, or other stone materials for the counters. With a growing family, the clients definitely wanted counters that would be stainproof. And, they wanted light colored counters to make their kitchen space as light and airy as possible. Their budget solution was light birch solid wood butcher block counter slabs from Ikea.
The Demo
Pretty straightforward, except for one requirement. The clients had a new baby (growing family, remember). So, having a working kitchen sink, a functional dishwasher, and some useable temporary counterspace throughout the renovation process was very important.


Our workaround was to rig up a temporary mobile sink using some 2×4 scraps and their old drop-in metal sink. The result wasn’t pretty, but was completely functional and convenient. It could be unhooked and moved out to the yard at the beginning of each workday and then moved back into the kitchen space each evening. That and a loaner microwave on a makeshift plywood counter got ’em through the reno process without their newborn even noticing a disruption.
Opening up the main wall for moving the sink plumbing also made it possible to rewire the kitchen circuits for their added hardwired undercabinet lighting — always a way better alternative to plug-ins. And, the clients got the bonus of being able to choose new locations for all their switches and outlets.
Opening up walls makes lots of things possible, from moving electrical to adding insulation. Think about what you’ll wish you had done, and then do those things when you’ve got the opportunity!
The Rebuild
This step was also pretty straightforward. Moving the sink plumbing would have been very difficult if the clients had wanted to keep the original cabinets. But the all-new to the studs redo made it easy to reframe the exterior wall for a 1-1/2″ bumpout to accommodate a new sink drain run.


Keeping the original windows was an added cost savings both for materials and reno time. Re-casing existing windows is way easier than installing new and can achieve almost the same remodel effect.
Same with keeping existing flooring. Minimizing the number of things being changed minimizes your contractor’s work time, which in the end minimizes the cost for an inexpensive full kitchen renovation!
Challenge #1 — Pivot to Counter Refinishing
Another benefit of working with a contractor who’ll actually work with you? Being able to test out your choices and make mid-reno changes!
We used the rough cut counter pieces as temp counters while finalizing the base cabinet installs. This let the clients test out the oiled butcherblock surface, which led to the realization that oiled butcherblock wouldn’t work for ’em. Apparently, all things baby related are abstract art stain makers for unsealed wood countertops.
The solution? A water-based food-safe durable poly finish! Off to the back porch workshop for sanding and refinishing …


Challenge #2 — Butcher Block Counter Installation
Normally, installing solid wood countertops is a pretty easy job even for a solo carpenter. Most kitchens have only a couple counter seams where slabs butt together. And, wood counter slabs can be measured, test fit, and cut in place using just basic carpentry tools.
For this project, installing the main perimeter counter was completely straightforward. Simply measure, cut, use steel straps to reinforce seams from underneath, spot-sand and re-poly the joints, and done:


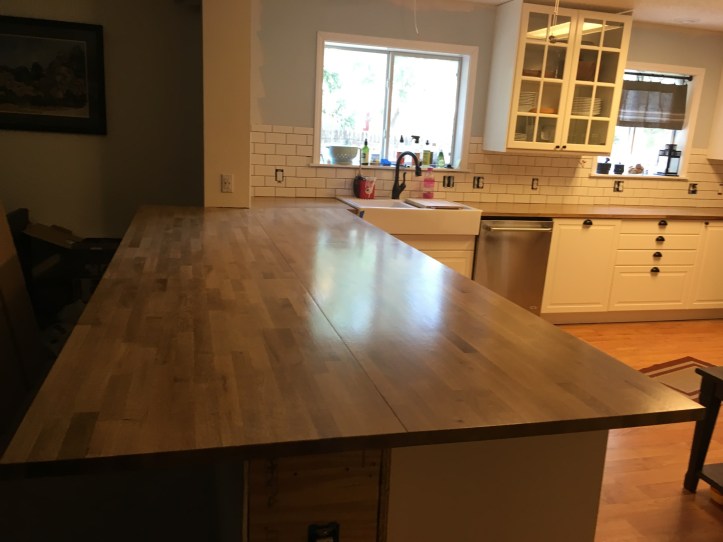
The not-normal part of this job was the clients’ wish to turn a kickwall into a massive countertop extension. Putting base cabinets on one side and a bar-style extension on the other, it would expanded the usable kitchen space by a third. Definitely the right design choice. Not the easiest install though!
Making the kickwall into a counter-height backstop for base cabinets was pretty simple. Just some basic carpentry, attention to detail, and rewiring for added outlets. The challenge was topping it with a massive 4ft wide by 10ft long stretch of countertop. Joining and leveling four separate solid wood slabs was not easy. Here are some pics of the process:


The result was worth the effort. Where formerly there was a nigh-useless 8in wide crappy kickwall, now there is a huuuuuge 4x10ft expanse of totally usable counter and bar space. Yay huge new usable counterspace!
Finish Bits
With the countertops all in the rest was easy-peasy with a stylish subway-style backsplash, some trim molding along the tops of the wall cabinets, and open shelf storage for a nice open feel.


These folks made a lot of smart choices for really maximizing their reno budget value for an inexpensive full kitchen renovation. Using simple open shelving rather than additional conventional wall cabinetry for added storage was just one example.
Another example was their decision to convert the terrible 1980s vintage overhead fluorescent light to an inexpensive but stylish fixture matching the rest of their decor.


Leaving the ceiling inset in place meant there was minimal carpentry or finish work for the conversion. It was simply a matter of lowering the existing electrical box and installing one piece of drywall with some paint. Viola!
The Final Result?
Judge for yourself. Especially compared to the ‘before’ pics, a pretty dramatic full kitchen renovation transformation for a reasonable cost:


And, most importantly, happy clients! You can read client reviews for other kitchen and bath reno projects Here on Yelp.